Showing posts with label pies/tarts/crumble. Show all posts

Monday, June 25, 2012

Fresh Strawberry Pie

I was craving something fresh and fruity when I saw that this month's "Have the Cake" challenge was strawberries. I really want to make it down to the U-pick farm and get some fresh strawberries but they aren't ready yet, so I used store bought strawberries. You know how it is when you buy fruit at the store, the fruit can either be good or blah. I hate when that happens! Luck was on my side and the berries were just fabulous!
The directions call for using mostly whole strawberries and while it worked out, I think next time I will quarter them.  This is another one of those recipes that I had stockpiled prior to my blogging days.  I have no idea where the recipe came from.  I printed this recipe out in early 2000!

Fresh Strawberry Pie
1 (9-inch) baked pie crust
3 pints strawberries, stems removed and hulled  
3/4 cup sugar (recipe called for one cup but my berries were pretty sweet)
1/2 cup water
3 tablespoons cornstarch
1/8 teaspoon salt

Take 2 pints of your prepared strawberries and arrange the berries, stem side down, on your prebaked pie crust; set aside.

In a medium size sauce pan mash the remaining one pint of strawberries; to this add the sugar, water, cornstarch and salt.  Stir over medium heat and allow the mixture to come to a boil; after it is at a boil cook for one minute more.  Remove the pan from the stove and allow the strawberry mash mixture to cool before pouring over the berries in the pie crust.
Refrigerate for three hours to allow the pie to "set".  Serve with fresh whipped cream.


Friday, September 16, 2011

Zucchini "Apple" Pie


With my abundance of zucchini this year, I decided to break down and try a recipe I have saved for many a year for Zucchini Pie.  Rumor had it that this pie tasted like apple pie.  I was skeptical.  I was very skeptical. However, I was running out of ideas with what to do with zucchini and I did find this recipe to be quite intriguing. I read a few different reviews online and took a few of the tips; use small zucchini and boil it.
The end result was quite fabulous.  In fact, I was so amazed by how this tasted that I had to take over three pieces to my in-laws to try and Neil's grandmother.  My father in-law is brutally honest and I suspected that he would find something to say about it.  Wrong! He practically licked the plate clean! They were all surprised by the taste and couldn't believe zucchini could taste like an apple pie. Feeling a little skeptical yourself?  I can't blame you.  But if you are willing to take the chance than this pie would be a pleasant surprise!
Zucchini "Apple" Pie 
no known source, have had this recipe for years

6 cups zucchini
1 cup granulated sugar
1/2 cup brown sugar
1 1/2 teaspoons cinnamon
1 1/2 teaspoons cream of tartar
2 tablespoons cornstarch
1/2 teaspoons salt
1 teaspoon vinegar
1/2 tablespoon butter
pastry for two crust pie

Directions 
Peel the zucchini, cut lengthwise, remove seeds and slice 1/4 inch thick
Cook zucchini slices in boiling water for 2 minutes.  You want the zucchini to still be tender and a bit firm. Drain zucchini.  Make sure the zucchini is well-drained and cool or else the sugar mixture will be a mess.  Tip: Mine still was quite liquid even after letting it cool and drain.  It did not affect the pie.

In a bowl, toss the zucchini with the sugars, cinnamon, cream of tartar, cornstarch and salt until well blended.
Place pastry in 9-inch pie pan.  Fill with zucchini mix.  Dot with butter and drizzle the vinegar of the the zucchini mixture.  Top with crust.  
Bake for 12 minutes at 475 degrees F.  Reduce heat to 350 and bake for another hour. Tip: I forgot to cover my pie rims with tinfoil and they burned slightly.  Be sure to keep rims covered until last half hour of baking.


Saturday, August 6, 2011

Salted Chocolate Tart


  • I wanted to do a celebration dinner for my daughter's new job and needed a dessert. Making a chocolate tart has been high on my "to do" list for sometime now so I did a bit of web surfing and came across this recipe for a Salted Chocolate Tart.  It is a very rich dessert but every bite is a taste of heaven!  Add the salt to the individual servings and not to the entire pie or else the salt will just melt into the leftover pieces.
Salted Chocolate Tart
  • Chocolate crust:
  • 6 tablespoons unsalted butter, softened
  • 3/4 cup powdered sugar
  • 1 1/4 cups all-purpose flour, plus more for rolling
  • 1/4 cup unsweetened cocoa powder (not Dutch-processed)
  • large egg yolks
  • Chocolate filling:
  • 8 ounces extra-bittersweet top-quality chocolate, such as Callebaut or Valrhona, chopped
  • 3/4 cup unsalted butter
  • 1/3 cup plus 1 tbsp. sugar
  • 1/4 cup brewed coffee
  • large eggs
  • Chocolate glaze:
  • 4 ounces extra-bittersweet top-quality chocolate, such as Callebaut or Valrhona, chopped
  • 2 tablespoons light corn syrup
  • 1/3 cup heavy whipping cream
  • 2 tablespoons unsalted butter, softened
  • Maldon sea salt for sprinkling (see Notes)

Preparation

  • 1. For the crust: In a stand mixer fitted with a paddle attachment, beat butter and sugar on medium speed until smooth. In a separate bowl, sift together flour and cocoa powder, then add to butter mixture and mix until combined. Add yolks and mix on low speed just until dough comes together. If small pieces remain, knead dough to blend them in. Form dough into a disk and wrap in plastic wrap. Chill for at least 1 hour and up to 3 days.
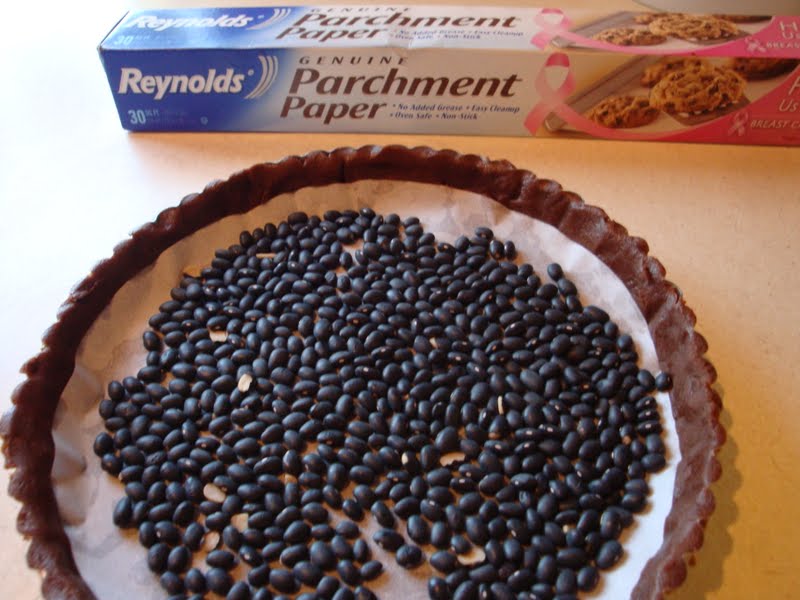
  • 2. Unwrap dough and set on a lightly floured work surface. With short strokes from center outward, roll into a 12-in. circle. Transfer dough to a 9 1/2-in tart pan and, using your thumb, press into sides and bottom corner. Trim dough flush with top edge. Line shell with parchment paper, completely fill with dried beans or pie weights, and chill at least 30 minutes. Meanwhile, preheat oven to 350°.
  • 3. Bake dough 10 minutes, then remove parchment and beans and return to oven until dough looks dry, about 5 minutes. Set on a rack to cool slightly.
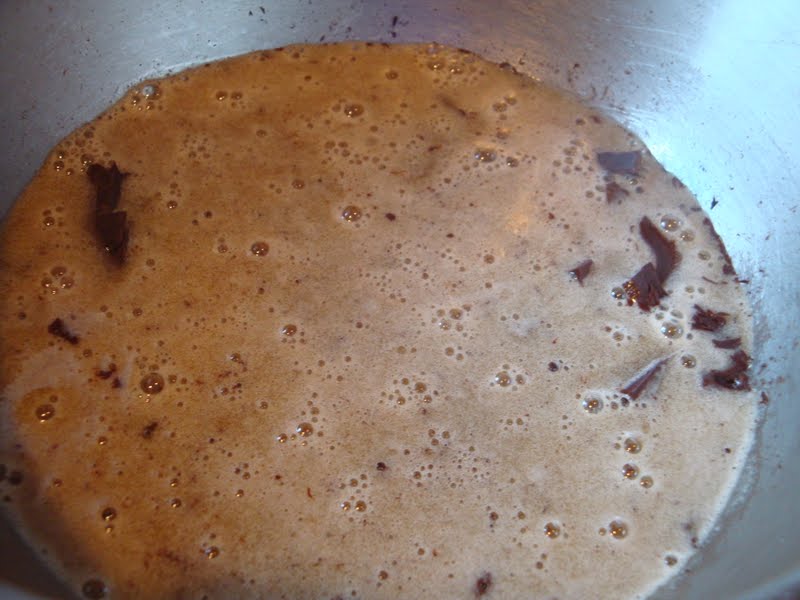
4. For the filling: Put chocolate in a medium-size heatproof bowl. In a medium saucepan, combine butter, sugar, and coffee and bring to a boil over medium heat. Pour hot liquid over chocolate and let sit 3 to 4 minutes, then gently stir until smooth. Break eggs into a large bowl and slowly pour in warm chocolate mixture, whisking constantly until incorporated
  • 5. Pour warm filling into still-warm tart shell. Bake until filling has risen slightly, appears dry on surface, and seems firm when shaken slightly, about 10 minutes. Set on a rack and let cool completely.
  • 6. For the glaze: Put chocolate and corn syrup in a medium bowl. In a microwave-safe container, heat cream to boiling; pour over chocolate. Add butter and stir slowly until smooth, working in one direction to prevent air bubbles from forming (if butter doesn't melt completely, microwave in 5-second intervals to warm slightly).
  • 7. Pour glaze onto center of tart and use a small spatula to push glaze to edges. Let sit at least 15 minutes to set up before slicing. Serve with a larger flake salt, I used Kosher salt, for sprinkling.


Friday, March 4, 2011

Irish Potato Pie


      I'm rather keen on holidays myself. While the kids were growing up I took great care to have the house decorated for every holiday. We even celebrated some of the lesser known celebration days such as Dr. Seuss day, Chocolate day... etc. The kids loved it and made for great memories and now I've restarted the tradition with my grandsweetie :-)
      Saying that, when I was asked to step in and fill the spot for the March challenge (have the cake) I was instantly drawn to traditional Irish desserts. There are many fabulous recipes sounding recipes out there but many included the use of whiskey or beer. I certainly want to try some of the stout beer recipes I found but was looking for something without alcohol. Interestingly enough, I came across this recipe for Irish Potato Pie and, to quote,"this recipe, with slight adjustments, was brought over "on the boat" by the cook's great-great-aunt shortly after a potato famine in the 1880s. When asked why she had brought a potato pie (rather than a fruit pie) recipe with her, she'd answer that she had hoped that America would have an abundant supply of potatoes, as in Ireland there was "nary a sound potato to be had there. May God bring them back." Of course, God did, and we celebrate that with the fine legacy of Aunt Bridget's potato custard pie. Mary Cummings, New Smyrna Beach, Florida, The Old Farmer's Almanac Recipe Contest, Dublin, New Hampshire."

     Doesn't sound like I could get a more traditional recipe than that! I found this pie to be a combination of vanilla custard and tapioca... taste wise, not texture wise.  The pie itself is rather firm like pumpkin pie is.


Irish Potato Pie


Yield: 8 to 10 servings
3 eggs
2 cups half-and-half or light cream
2 cups mashed potatoes (whipped smooth with no lumps)  I'm assuming they mean without milk or butter... that's what I did any way.
1 cup sugar
1 teaspoon vanilla extract
1/4 teaspoon salt
1 tablespoon Irish whiskey, brandy, or sherry (optional)  
1 unbaked 10-inch deep-dish pie shell with high fluted edge
Freshly grated nutmeg
Toasted slivered almonds

Directions

Preheat the oven to 350°F. In a mixing bowl, beat the eggs slightly. Stir in the half-and-half or cream, potatoes, sugar, vanilla, salt, and liquor (if using). Beat well until smooth.
Cover the fluted edge of the pie shell with aluminum foil to prevent overbrowning. Pour the filling into the shell and sprinkle with nutmeg. 
Place on the center rack of the oven and bake for 40 minutes. Remove the foil and bake for 15 to 18 minutes more, or until a toothpick inserted in the center comes out clean. Cool on a wire rack. Sprinkle the almonds around the outer edge and dust with additional nutmeg. Serve at room temperature; store in the refrigerator.

Saturday, November 27, 2010

Pumpkin Pie from Scratch… or to be more exact; the misadventures in pie making

I know I should be far more creative than using pumpkin for my squash entry, but this is the first time I ever made a pumpkin pie from scratch.
I bought several sugar pumpkins last month and had to get them in the freezer.  Right away I knew I would put aside some of the pumpkin to make a pie for Thanksgiving.  There are several methods of storing sugar pumpkins but I prefer to steam them and then freeze.  While I'm sure there are some raw methods out there, most of the pumpkin recipes I have ask for cooked pumpkin so its easier for me to store them this way.  Now I have used the good old jack O’lantern pumpkins before and used the same method of storing but I heard that sugar pumpkins were the way to go so jumped on them when I finally saw some in our store.  Sugar pumpkins are much smaller and the flavor is more intense than what you would get from the typical Halloween jack O'lanterns (big pumpkins!) I've never had a problem using the big pumpkins in cooking before but I suggest you read up on the two differences before you make your own decision.
First you need to cut them and remove the seeds and pulp.  I then just put the pi002eces (flesh still on) into a glass baking pan, add a bit of water and cover with Saran Wrap.  Into the microwave it goes to steam for about ten minutes.  I take the pan out and let the pumpkin cool.  Now its easy to pull away from the flesh (no peeling needed!).  I do a bit of pureeing and place into ziplock bags putting in 1 1/2 cups of pumpkin puree into each bag.
004When using fresh pumpkin, you must drain the puree through some cheese cloth to eliminate the liquid.  All you want to have is the meat of the pumpkin.  I find it    easier to drain over a bowl and refrigerate over night.008
Use your favorite pastry for a 9-inch pie.  My mom swears by the Betty Crocker pastry and so we’ve used that recipe for years.  
Crust for 9-inch pie
1 cup flour
1/2 teaspoon salt
1/3 cup plus 1 tablespoon shortening
2 to 3 tablespoons cold water     
Directions: Mix flour and salt in medium bowl. Cut in shortening, using pastry blender (or pulling 2 table knives through ingredients in opposite directions), until particles are size of small peas. Sprinkle with cold water, 1 tablespoon at a time, tossing with fork until all flour is moistened and pastry almost leaves side of bowl (1 to 2 teaspoons more water can be added if necessary).
Gather pastry into a ball. Shape into flattened round on lightly floured surface. Wrap flattened round of pastry in plastic wrap and refrigerate about 45 minutes or until dough is firm and cold, yet pliable. This allows the shortening to become slightly firm, which helps make the baked pastry more flaky. If refrigerated longer, let pastry soften slightly before rolling.
Roll pastry, using floured rolling pin, into circle 2 inches larger than upside-down 9-inch glass pie plate, or 3 inches larger than 10- or 11-inch tart pan. Fold pastry into fourths; place in pie plate. Unfold and ease into plate, pressing firmly against bottom and side and being careful not to stretch pastry, which will cause it to shrink when baked.
Trim overhanging edge of pastry 1 inch from rim of pie plate. Fold and roll pastry under, even with plate; flute as desired. Continue with directions in pie recipe.
Pumpkin Filling for 9-inch pie
2 eggs
1/2 cup sugar
1 teaspoon ground cinnamon
1/2 teaspoon  salt        
1/2 teaspoon ground ginger
1/8 teaspoon ground cloves
                       1 can (15 oz) pumpkin (not pumpkin pie mix) or use 1 1/2 cups prepared pumpkin
 1 can (12 oz) evaporated milk
      Directions: Heat oven to 425°F. In large bowl, beat eggs slightly with wire whisk or hand beater. Beat in 1/2 cup sugar, the cinnamon, 1/2 teaspoon salt, ginger, cloves, pumpkin and milk.  Carefully pour pumpkin filling into pie plate. Bake 15 minutes. Reduce oven temperature to 350°F. Bake about 45 minutes longer or until knife inserted in center comes out clean. Place pie on cooling rack. Cool completely, about 2 hours.
Pumpkin Patch                                                          Now all things considered, what should turn out is an amazing pumpkin pie.  Without a doubt ours did… however, the pie pan was placed on a stove top burner to cool.  We honestly thought the burner was off… really, we did.  My stove is possessed- really, it is possessed!  There is no other explanation as to why it is so evil.  The next morning we awoke to this…. Pumpkin jerky…. nasty.  Don’t recommend it to any one! LOL!!!                     

Saturday, August 28, 2010

Lemon Galette

amazing yummy-ness!
The challenge for Have the Cake this month was to make a Galette.  What is a galette you may ask - good question!  It is a thin, crisp open faced tart.  Unlike most tarts, this one requires no tart pan.  It is more rustic looking and I really like that look!
I found the recipe for Lemon Galette on Cooking.com.  The recipe there was reprinted by permission of Weldon Owen and had all rights reserved.  I'm not about to infringe on someone's copyright so be sure to visit the link for this amazing recipe!

Saturday, March 27, 2010

Daring Baker Challenge: Orange Tian


The 2010 March Daring Baker’s challenge was hosted by Jennifer of Chocolate Shavings. She chose Orange Tian as the challenge for this month, a dessert based on a recipe from Alain Ducasse’s Cooking School in Paris.
The conditions were:  you must make the tart dough, the whipped cream, the caramel sauce, citrus segments and marmalade
This was my first baking challenge with the Daring Kitchen and a challenge it was for me indeed! I have no idea why I struggled with these recipes but everything that could go wrong, did go wrong! I made my Pate Sablee recipe twice.  The first time I put the pastry dough onto the bottom of my springform pan and it stuck! It was not as "pretty" as I wanted it to be so I remade the dough and this time I baked the dough on my silicon baking sheet and it came out beautiful!  However, when I went to put the baked pastry on top of my dessert it shattered... perhaps I had rolled it to thin?? Anyway, I picked up the pieces and put them on top of the whipped cream.  I was tired and by this time I figured since it would be on the bottom of the dessert it really didn't matter.
I had juiced my oranges and had divided the juice so that I had the juice for my marmalade and caramel sauce separate.  In theory, this was a good idea since one used only a 1/4 cup and the other used 1 1/4 cup.  However, I grabbed  the larger amount for my marmalade (without thinking) and had to readjust my pectin to make it work. The end result was actually quite delicious so in the end my mistake turned out just fine.
For the Pate Sablee:
2 medium-sized egg yolks at room temperature
granulated sugar 6 tablespoons + 1 teaspoon; 2.8 oz; 80 grams
vanilla extract ½ teaspoon
Unsalted butter ¼ cup + 3 tablespoons; 3.5 oz; 100 grams ice cold, cubed
Salt 1/3 teaspoon; 2 grams
All-purpose flour 1.5 cup + 2 tablespoons; 7 oz; 200 grams
baking powder 1 teaspoon ; 4 grams

Directions:
Put the flour, baking powder, ice cold cubed butter and salt in a food processor fitted with a steel blade.  (I don't have a food processor so I just used my mixer)
In a separate bowl, add the eggs yolks, vanilla extract and sugar and beat with a whisk until the mixture is pale. Pour the egg mixture in the food processor.
Process until the dough just comes together. If you find that the dough is still a little too crumbly to come together, add a couple drops of water and process again to form a homogenous ball of dough. Form into a disc, cover with plastic wrap and leave to rest in the fridge for 30 minutes.
Preheat your oven to 350 degree Fahrenheit.
Roll out the dough onto a lightly floured surface until you obtain a ¼ inch thick circle. Using your cookie cutter, cut out circles of dough and place on a parchment (or silicone) lined baking sheet. Bake for 20 minutes or until the circles of dough are just golden

For the Marmalade:
Freshly pressed orange juice ¼ cup + 3 tablespoons; 3.5 oz; 100 grams
1 large orange used to make orange slices
cold water to cook the orange slices
pectin 5 grams
granulated sugar: use the same weight as the weight of orange slices once they are cooked

Directions:
Finely slice the orange. Place the orange slices in a medium-sized pot filled with cold water. Simmer for about 10 minutes, discard the water, re-fill with cold water and blanch the oranges for another 10 minutes.  Blanch the orange slices 3 times. This process removes the bitterness from the orange peel, so it is essential to use a new batch of cold water every time when you blanch the slices.
Once blanched 3 times, drain the slices and let them cool.  Once they are cool enough to handle, finely mince them (using a knife or a food processor).
Weigh the slices and use the same amount of granulated sugar . If you don’t have a scale, you can place the slices in a cup measurer and use the same amount of sugar.
In a pot over medium heat, add the minced orange slices, the sugar you just weighed, the orange juice and the pectin. Cook until the mixture reaches a jam consistency (10-15 minutes).  Transfer to a bowl, cover with plastic wrap and put in the fridge.

For the Orange Segments:
For this step you will need 8 oranges.
Cut the oranges into segments over a shallow bowl and make sure to keep the juice. Add the segments to the bowl with the juice.
[See YouTube video in the References section below for additional information on segmenting oranges.]  Using YouTube proved to be very helpful.  I was quite intimidated by this step but segmenting turned out to be easy and just tedious.

For the Caramel:
granulated sugar 1 cup; 7 oz; 200 grams
orange juice 1.5 cups + 2 tablespoons; 14 oz; 400 grams

Place the sugar in a pan on medium heat and begin heating it. Once the sugar starts to bubble and foam, slowly add the orange juice. As soon as the mixture starts boiling, remove from the heat and pour half of the mixture over the orange segments.
Reserve the other half of the caramel mixture in a small bowl — you will use this later to spoon over the finished dessert. When the dessert is assembled and setting in the freezer, heat the kept caramel sauce in a small saucepan over low heat until it thickens and just coats the back of a spoon (about 10 minutes). You can then spoon it over the orange tians.

For the Whipped Cream:
heavy whipping cream 1 cup; 7 oz; 200 grams
3 tablespoons of hot water
1 tsp Gelatine
1 tablespoon of confectioner's sugar
orange marmalade (see recipe above) 1 tablespoon

In a small bowl, add the gelatine and hot water, stirring well until the gelatine dissolves. Let the gelatine cool to room temperature while you make the whipped cream. Combine the cream in a chilled mixing bowl. Whip the cream using a hand mixer on low speed until the cream starts to thicken for about one minute. Add the confectioner sugar. Increase the speed to medium-high. Whip the cream until the beaters leave visible (but not lasting) trails in the cream, then add the cooled gelatine slowly while beating continuously. Continue whipping until the cream is light and fluffy and forms soft peaks. Transfer the whipped cream to a bowl and fold in the orange marmalade. [Tip: Use an ice cold bowl to make the whipped cream in. You can do this by putting your mixing bowl, cream and beater in the fridge for 20 minutes prior to whipping the cream.]

Assembling the Dessert:
Make sure you have some room in your freezer. Ideally, you should be able to fit a small baking sheet or tray of desserts to set in the freezer.
Line a small tray or baking sheet with parchment paper or a silicone sheet. Lay out 6 cookie cutters(if you used them to make your pastry) onto the parchment paper/silicone.
Drain the orange segments on a kitchen towel.
Have the marmalade, whipped cream and baked circles of dough ready to use.
Arrange the orange segments at the bottom of each cookie cutter(or as I did, the bottom of my springform pan). Make sure the segments all touch either and that there are no gaps. Make sure they fit snuggly and look pretty as they will end up being the top of the dessert. Arrange them as you would sliced apples when making an apple tart.
Once you have neatly arranged one layer of orange segments at the bottom of each cookie cutter, add a couple spoonfuls of whipped cream and gently spread it so that it fills the cookie cutter in an even layer. Leave about 1/4 inch at the top so there is room for dough circle.
Using a butter knife or small spoon, spread a small even layer of orange marmalade on each circle of dough.Carefully place a circle of dough over each ring (the side of dough covered in marmalade should be the side touching the whipping cream). Gently press on the circle of dough to make sure the dessert is compact. (Mine broke in my hands as I was flipping it over on to the whipped cream layer. I pieced it in!)
Place the desserts to set in the freezer to set for 10 minutes.
Using a small knife, gently go around the edges of the cookie cutter to make sure the dessert will be easy to unmold. Gently place your serving plate on top of a dessert (on top of the circle of dough) and turn the plate over. Gently remove the cookie cutter, add a spoonful of caramel sauce and serve immediately.


Tasted great and my mistakes never mattered!
Print Friendly and PDF

Friday, March 19, 2010

Sunny Day Rhubarb Crunch

A have the three most awesome children (biased, I know) and love them to death.  Our youngest is the only one left at home now and so I end up making a lot of his favorite foods.  I took a peek out our window this morning and saw that our rhubarb plant is starting to come up.  Seeing as I still had some bags of rhubarb in the freezer to use up, I thought I would put together one of my son's favorite desserts;
Grandma Helen's Rhubarb Crunch

for topping:
1 teaspoon cinnamon
3/4 cup rolled oats
1/2 cup butter or margarine
1 cup flour
1 cup brown sugar
filling:
1 cup sugar
1 cup water
2 tablespoons cornstarch
1 teaspoon vanilla extract
4 cups rhubarb, cut in 1" pieces (4 cups fresh,
but I like to use 6 cups if rhubarb is frozen)
1 pint fresh strawberries, sliced

Directions 
Preheat oven to 350 degrees F.
Crumb together topping ingredients and set aside.
If using frozen rhubarb, thaw and drain liquid and place into a 9-in x13-in baking pan;
 top with sliced strawberries.

 On stove, in medium sauce pan combine sugar, water and cornstarch. Cook until thick and clear. Remove from heat and stir in vanilla extract. Pour sauce over rhubarb and sprinkle crumb mixture over rhubarb.
Bake at 350 degrees for one hour or until golden brown and juice is bubbling.
If It's all bubbly and golden brown then its down.... MMMM. smells so yummy!
Print Friendly and PDF