Showing posts with label Betty Crocker. Show all posts

Monday, December 19, 2011

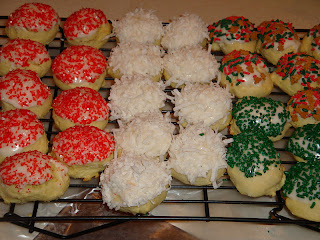
Cooky - Candies


My mom loves Christmas and she loved baking Christmas goodies. Standing for long periods of time no longer works for her, so I carry on the baking tradition for her (oh darn, eh!!!!) I have great memories of her and I being in the kitchen.  Of course, being a sprinkle addict you can imagine how happy I was helping her out with holiday cookies!  I'm sure I got more sprinkles on the floor than I did on the cookies (I know my kids did!) but what great memories.
This recipe is from my all time favorite cookie book, "Betty Crocker's Cooky Book".  Though the pictures are a bit dated, the recipes remain down right delicious!
Cooky - Candies
Betty Crocker's Cooky Book

1 cup butter or margarine
3/4 cup sifted confectioners' sugar
1 tablespoon vanilla
2 cups all-purpose flour, sifted
3/4 teaspoon salt
1/2 cup rolled oats

Frosting
1/2 cup semi sweet chocolate pieces 
1/4 cup milk 
     OR
2 1/2 cups powdered sugar

2 tablespoons water
1 tablespoon butter, softened
1 tablespoon light corn syrup
1/2 teaspoon almond extract or vanilla, if desired
Food color, if desired


Directions:
Preheat oven to 325 degrees F.
Mix butter, sifted sugar, and vanilla well.
Add sifted flour,  salt and rolled oats into butter mixture.
Shape teaspoonfuls of dough into rounds, balls, crescents, triangles and bars. 
Bake on ungreased baking sheet 20 to 25 minutes, or until golden around edges.
Let cool or wire rack.

Chocolate Glaze:
Melt chocolate; add milk; blend until smooth.  
Dip cookie tops in chocolate; then dip into desired toppings.

Powdered Sugar Glaze
Combine powdered sugar, water, butter, corn syrup and vanilla in small bowl;
 mix until powdered sugar is moistened. 
Beat at medium speed until smooth, adding additional water, if necessary,
 to reach desired spreading consistency. Tint with food color, if desired.

Glaze cooled cookies. Let stand until hardened (6 hours or overnight).

Monday, September 26, 2011

Cake mix cookies challenge: Caramel Corn Cookies


This has been a crazy month with all the garden produce coming in at once.  Why does that always happen? I've been canning like crazy and still trying to keep up on my challenges.  I'm managing pretty well, only I haven't been keeping up with posting on my blog.
It is with deep sadness that I will have more time on my hands now and should get back into the swing of things.  My husband had lost his job in May and although the circumstances weren't ideal, I loved having my husband home the past four months!  He started a new job today and will be missed greatly during my days.  I think retirement is too far off!  Miss you Neil!
Anyway, This month's Cookie Carnival Challenge was to create a cookie using a boxed cake mix.  I wanted to try and create one of our favorite fall treats; Caramel Corn.  While they are not quite the caramel corn flavor I was looking for, I did get thumbs up reviews from the cookie bunch! The cookie carnival is  great and is always looking for new members.  Pop on over to Tami's site and join us today~

Caramel Corn Cookies
1 box Betty Crocker Vanilla Cake Mix
2 eggs
1/2 cup vegetable or canola oil
1 1/2 cups crushed Kix cereal, divided
1 cup peanuts, coarsely chopped
1 cup Kraft Caramel Bits (found in the baking aisle with the chocolate chips.. I think they are a seasonal item)


Directions:
Preheat oven to 350 degrees F.
Combine Cake mix, eggs and oil; mix well together.  Add 1/2 cup crushed Kix cereal, peanuts and caramel bits, blend well.
Roll 1 tablespoon of dough into remaining Kix cereal and place on lightly greased cookie sheet (I use parchment paper instead),  and space two inches apart.
Bake for 12-15 minutes.  Let cool on cookie sheet two minutes before placing on cooling rack.


Monday, August 8, 2011

Betty Crocker Cooky Book


Do you have a cookbook that gives you great recipes, but also fond memories?  I was in the kitchen along side my mom from the time I could walk.  We were baking buddies then, and still are today.  I grew up using the Betty Crocker Cooky Book... it is sooooooo 1960's with its groovy color choices!  That being said, it is my first "go to" cookie book.  I've never had a recipe fail, although there have been a few that I have not cared for because of taste preferences.
Unfortunately, my mom ended up tossing this cook book after it got all ratted and torn. I didn't realize this until after I had married and went to borrow the book from her.  This was before the days of Amazon and I thought I had lost this book forever.
In 1996, I was visiting a good friend and her daughter was making pig shaped cookies.  They turned out really cute so I asked her where she got the idea from.  Much to my surprise it was from the Betty Crocker Cooky Book!  She had found it at a garage sale.  I shared with her my memories and we both got a laugh from it.  Much to my surprise, on Mother's Day my dear friend turned over this precious book to me for a gift.
This book does give me fond memories not only of baking, but also of my friend who lost the battle with breast cancer a few years ago.  Now when I look through the pages I not only remember the moments of cooking along side my mom, but also of the laughter and tears my friend and I shared.  I hope that everybody has a special cookbook that they hold near and dear to their hearts... we all need one.

Saturday, June 4, 2011

Lemon White Chocolate Cheesecake Bites


It seems like all the baking I've been doing these past few months have been for events.  Not that this has proven to be a problem... better that I get lots of people eating my goodies than just me!  Straight from the "Betty Crocker Best Cupcakes & Cakes" came the delightful little mouthfuls.  They were just perfect for the dessert table at our ladies tea!  There is just something about mini foods that I find just especially tasty.  Maybe its because I can get away with eating three (or four) of them as compared to one big piece of cheese cake.  I'm not saying it makes a whole lot of caloric sense - just that in my greedy little mind, more seems all the better!


Lemon White Chocolate Cheesecake Bites
Crust:
1/2 cup graham cracker crumbs
1 teaspoon sugar
2 tablespoons unsalted butter, melted, slightly cooled.
Filling:
1 package (8 ounces) cream cheese, softened
1/4 cup sugar
1 egg
1 teaspoon grated lemon peel
1/2 cup white vanilla baking chips
1 teaspoon vegetable oil


Directions:
Heat oven to 300 degrees F.  Place mini paper baking cups in each of 18 mini muffin cups; spray paper cups with cooking spray.  In medium bowl, mix crust ingredients until crumbs are moistened.  Spoon and lightly press 1 teaspoon mixture in bottom of each cup.
Add chips then add more mixture
In Large bowl, beat cream cheese and 1/4 cup sugar with electric mixer on medium speed until well blended.  On low, beat in egg until smooth.  Add lemon peel and lemon juice; beat until smooth.  Spoon about 1 teaspoon cream cheese mixture into each paper cup.  Place 5 to 6 of the white baking chips on top of each (using 1/4 cup total).  Divide remaining cream cheese mixture evenly among cups (about 2 heaping teaspoons each).  Bake 25 to 30 minutes or just until filling looks set.  Cool on racks 30 minutes.  Refrigerate 1 hour.
after baking

 In Small microwavable bowl, microwave remaining 1/4 cup white baking chips and the oil uncovered on high 30 to 40 seconds until mixture can be stirred smooth.  Drizzle over cheesecakes.  Store covered in refrigerator.

Tuesday, May 31, 2011

Have the Cake Challenge: No Fail Pound Cake


What does this box of cake mix have to do with pound cake???? Well, let me tell you :-)  I recently was asked to make a wedding cake for a friend.  She didn't want anything too heavy and really was interested in me using cake mix.  Thankfully she just wanted a butter cream frosting and not fondant as I have found cake mixes do not hold up to well under fondant!  But I digress... I found a recipe using cake mix and adding just a few more ingredients to extend the mix size and give it a slightly firmer texture.  It came out phenomenal!  So when this month's Have the Cake Challenge was pound cake and I came across this recipe for No Fail Pound cake, I just had to give it a try!

This was a big hit!  I mean, this was a massive huge hit for my family. I did make a few minor adjustments (no surprise there!) but I will be sure to give the exact recipe with my adaptations in italic. It is not as dry as many pound cakes are and less heavy.  
No Fail Pound Cake
by  Patsy with adjustments by me (in italic)
  • 1/2 cup butter
  • 1 cup white sugar
  • 3 eggs
  • 1 teaspoon vanilla extract     I used 2 teaspoons of vanilla bean paste instead of the extracts
  • 1 teaspoon lemon extract     omitted
  • 2/3 cup water
  • 1 (8 ounce) container sour cream1 (18.25 ounce) package yellow cake mix      I used Betty Crocker  Super  Moist Butter Recipe, Yellow
  • 1 cup all-purpose flour

Directions

Preheat oven to 350 degrees F (175 degrees C). Grease and flour a 10 inch Bundt pan. In a large bowl, cream together the butter and sugar until light and fluffy. Beat in the eggs one at a time, then stir in the vanilla and lemon extract (or in my case the vanilla bean). Beat in water and sour cream. Beat in the cake mix and flour. Pour batter into prepared pan
Bake in the preheated oven for 60 to 80 minutes, or until a toothpick inserted into the center of the cake comes out clean( mine took just under an hour). Let cool in pan for 10 minutes, then turn out onto a wire rack and cool completely


Thursday, March 24, 2011

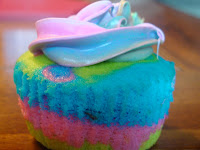
tie dye cupcakes


Standing in the checkout line my eyes glanced over and I saw a picture of the most amazing looking cupcakes. Betty Crocker has a small booklet out titled "Best Cupcakes and Cakes," available until April first, and let's face it... if it has cupcakes on it than I'm on it!
 While a bit tedious, it was rather simple to do.  You take a basic white cake mix and make the batter according to the instructions.  Next, divide the batter into 3 to 6 colors... the Betty Crocker version has six colors but I only wanted to work with three.  Add a different food color to each  bowl. Place 1 level teaspoon of each color batter into each muffin cup, layering your colors until all the batter is gone.  It is important to not stir the batter in the muffin cups!!! 

Each cup will be only about half full.... I find that to be a good amount especially for when I use a boxed cake mix.  Bake at 350degrees F.  for 15 to 20 minutes or until a toothpick comes out clean.  Cool completely before frosting,

Now here comes the tricky part... use the largest size of disposable decorating bag that you can find.  I only had a small size one and getting my three colors of frosting in there was a real pain!  Unfortunately I do not have any pictures showing the frosting technique as I was unable to juggle both the decorating and the frosting at the same time.  I used my Wilton 1M star tip, but the instructions call for the #6 star tip.  I also cheated and used the 2 containers of Betty Crocker Rich and Creamy white frosting that the instructions called for... yes, a store bought frosting. Although I prefer a homemade frosting, It is perfectly ok to go the lazy route from time to time; especially when its for kids! LOL!
Place spoonfuls of each color of frosting (I used the same three colors I used for my cake batter and the instructions only used 3 colors as well) side by side in bag, alternating colors and working up from tip of bag.  Do not stir colors together.  Pipe frosting clockwise for 3 rotations, working toward the center and ending in a small peak.   


They turned out pretty cool and the kids loved it!!!!