Showing posts with label chocolate. Show all posts

Saturday, December 29, 2012

Pinned there, done that: Chocolate Chip Cookie Dough Truffles


These were so fantastic I ended up having my husband taking a bunch to work just so I wouldn't have them end up on my thighs(and tummy, butt, etc) I also made some Kahlua Chocolate Mocha truffles the same day.  Trust me when I say this, dipping nine dozen truffles in one day is a dumb thing to do! I just can't stand in one place for that long of period of time without my body paying for it the next day.  If (and that's a BIG if) I could trust myself enough to avoid sneaking into the freezer to it them, it would work well to freeze these and just dip them into chocolate when you want them.  I know me though and that would not work.  But hey, if you have more will power than me just go ahead and give it a try!

These Chocolate chip cookie dough truffles, and their variations, have been pinned hundreds of times.  I'm more of a raw cookie dough gal than an actual baked cookie dough gal, so when I saw the pin I knew it had to be done.

This is the recipe I sort of  followed.  Here is what I did:
Chocolate chip cookie dough truffles

1/2 cup butter, softened
3/4 cup packed brown sugar
1 1/2 teaspoon vanilla extract
1/2 teaspoon salt
2 cups all-purpose flour
1 can (14 ounces) sweetened condensed milk
1 cup miniature semisweet chocolate chips
1-1/2 pounds chocolate, chopped, tempered and ready to use.

Cream together butter and brown sugar for a good three minutes.  It takes at least three minutes for the mixture to cream up nicely so don't try to cheat on this!  Add the vanilla and salt, mix together.  Slowly add the flour (I used the lowest speed on my Kitchen Aid mixer) mix to combine then add the sweetened condensed milk. Mix until well blended.  By hand stir in the 1 cup miniature chocolate chips (if you want nuts, go for it! But use 1/2 cup nuts and only 1/2 cup chocolate chips.)  Refrigerate dough for a couple of hours.  I used my smallest cookie scoop to make the truffles.  I found that when the dough was refrigerated before hand I didn't have any problems with the dough being sticky.  I also didn't have to roll them by hand since my scoop got them nice and tight.  I did have to stick the dough back into the refrigerator again once I was half way through as the dough started to get sticky.  Another half hour in the fridge and all was good again.  Hubby, however, liked the look of them being more rounded so he did a few trays that way for a photo.

I don't care to use the candy melts or almond bark for my candies, but hey - if that's your thing then I say go for it!  I must admit that it does make the job easier for dipping chocolates using those products. I bought some chocolate in bulk at the local Winco store a few months back.  It had to be tempered (tempering gives the chocolate that nice glossy look and also gives it the crisp crunch when you bite into it) but the word tempered sounds more scary than it really is. My chocolates didn't get the high gloss I usually get but that didn't alter the taste at all!
I believe this recipe made over five dozen truffles.... we won't discuss how many didn't get made since I picked at the dough throughout the process.


Thursday, November 29, 2012

When the going gets tough.....

What do you do when the going gets tough?  I've got several bad habits (eating bad for you foods, spending money I really don't have, pity parties) that I always seem to steer towards first.  Some not as bad like baking, crafting, cranking the music up really loud or taking a dip into the hot tub. As I'm getting older I find that I am turning more quickly to the Lord... I only have day long pity parties instead of week (or month, or year) long ones. My ultimate goal is to seek Him first and foremost and I am forever thankful that God is patient with me.

I had Bible study today in which we wrapped up the book of Ecclesiastes. An excellent study and it was not anything that I had anticipated it would be.  The first time I read Ecclesiastes I saw it as being depressing but now I see it as one of the best Bible books on hope!  For me there is just nothing more reassuring to know that there is nothing new under the sun.  What I've struggled with are basically the same struggles everyone has dealt with since sin entered the world.  It stinks to know that others are hurting, but there is also that comfort in knowing that I'm not alone.

Right now I'm going through a rough patch.  The kids are all going through various struggles, hubby is stressed out over his job, my own health issues... blah. It is just hard feeling for me to get over the funk this time.  When we were kids we often used the term "Indian Giver" when ever someone took back something that they had given you.  I'm very much like that with God.  I'm an "Indian Giver."  I give God my struggles and then take them right back (because I want to control things.... yeah people, I'm a control freak) Trust is a hard to have when His ways aren't always the ways that my eyes see best.  I know the truth.  His ways are not are ways and sometimes its just best for me if the answer is No or wait.  I don't think there are certain things that I can do and yes, I am bold enough to tell God that! I can think of several areas in my life, past and present, where I can say that I was not the right person for the job God gave me.  There was something I read in this week's study:
God doesn't want our ability He wants our availability.
It is when I struggle, feel at my weakest and uncertain that I cling to God. The situations I'm going through cause me to cling (eventually!) to God. He isn't looking for me to know all the answers, He knows the right answers.  It doesn't matter if I don't know what I'm doing as He knows what He's doing.  He just wants me to be available to Him.

There is no quick fix or witty wording that I give that will tell you how to conquer this issue.  I will continue to Trust in God (even if it takes me time to get there) and continue to move forward.  What do you do when the going gets tough? Is there a favorite comfort food you seek out? A hobby you dive in to? Song or artist you listen to?  I would love to hear about it.

As I mentioned, I find baking very comforting and its a blessing to be able to turn around and give the baked items away to someone.  Here is a recipe I like to whip up when I'm feeling down:


I no longer remember where I got this recipe from. It has been in my MasterCook program for... well, ever since MC came out! This is one of my favorite cookies as they remind me of brownie bites. I've seen other recipes for Mud Puddle Cookies, but they are not the same as these cookies. I'm guessing that the creator of these cookies named them mud puddles because of their soft center.

It took me several attempts at these cookies before realizing that the centers, of the cookie, were designed to be soft, with a fudge brownie type consistency. At first I thought that they were not being cooked long enough but getting the centers to be less soft caused the outer edges to be well over done. The texture in the center is so different from the outer edges that it isn't uncommon for me to have to explain that these cookies are not under-cooked  They are quite addictive and once people get used to the texture, it is hard to keep them away from them.

Mud Puddle Cookies

1/4 cup butter
2 cups milk chocolate chips
14 ounces sweetened condensed milk
1 1/2 cups all-purpose flour
1 cup powdered sugar
1/2 teaspoon vanilla
4 teaspoons milk

Directions:

Heat oven to 350 degrees Fahrenheit. Melt butter and chocolate chips in a 2-quart saucepan over low heat, stirring constantly until smooth. Remove from heat.


Add condensed milk and stir until smooth. Add flour and mix well. The dough will be soft like brownie batter would be.

Shape rounded teaspoonfuls of dough into 1-inch balls. Place dough 1-inch apart onto ungreased cookie sheets. I like to use my silicon baking sheets to prevent sticking. Bake for 8 minutes. 
Cool completely

Meanwhile combine powered sugar and vanilla in small bowl. Gradually stir in enough milk for desired glazing consistency. Drizzle over cookies
This recipe yields 3 1/2 dozen cookies.


Friday, June 8, 2012

Chocolate Cottage Cheese Cookies

While recovering from the surgery, I used some of the time to go through all my old cookbooks.  I have three cookbooks from our church.... we ladies do like to cook!  It is fun to see how cooking styles have changed over the years.  One recipe I came across was for Cottage Cheese Cookies and I thought it would be a great one to try out for the Walden house.  I thought there was too much sugar in the recipe and so I cut the sugar down and I added in cocoa powder.  The result was a a nice cake like cookies (reminded me of snackwells... remember those?) and it was not overly sweet.  I think if I was going to make them for kids I would keep the sugar at the normal amount and not reduce.  Pushing the cottage cheese through a strainer first would also eliminate the little chunks of cottage cheese I had in them.  Personally, I didn't mind the cottage cheese pieces, but it may look like chunks of baking powder or soda in it to some people.  Overall, we thought it was a keeper recipe.


Chocolate Cottage Cheese Cookies
Mountain viewcookbook;  Adey Altmeyer
Made june 4

2 cups margarine
2 cups sugar
1 ½ cups brown sugar
4 teaspoons vanilla
4eggs
2 cups cottage cheese
5 ½ cups flour
2 teaspoon baking powder
1 teaspoon baking soda
1 teaspoons salt
1 cup cocoa
1 cup chopped nuts

Cream together, margarine, sugars, vanilla, eggs and cottage cheese.  Mix together, flour baking powder, soda, salt and cocoa.  Add to creamed mixture; add nuts and blend.  Mix well and chill for several hours.  Roll walnut size balls in powdered sugar.  Bake at 350° on greased cookie sheet for 12 to 15 minutes.  Keep dough in fridge between sheets to keep chilled
Yields 7 dozen cake cookies
Notes Reduced brown sugar to 1 cup and granulated sugar to 1 ¾ cup


Sunday, June 3, 2012

Chocolate Sponge Cake

 Having to depend on people for driving and even walking has been a bit of a bummer. During the week I was able to increase my activity but still couldn't go out and do things on my own.  Makes for some very dull days around the house.  I miss my grandsweetie something fierce!  I can't do any lifting for four weeks, thus my mom is watching her at my daughter's home.  On Thursday I was able to get a lift to Bible study so at least I had that, but upon returning home I was left with everyone being out of the house and the sky gray and dreary.... seemed to me like a good day for chocolate, eh!!!!  Ok, so I can't eat it, but I can smell it and bake with it.  Baking is one of the things that truly does lift my spirits.  Listening to loud music and singing along is another thing..... but trust me, you do not want to actually hear me!

My husband grew up with a delicious sponge cake his mother made for him.  When I saw a recipe for a chocolate sponge cake I had one of those "Well, DUH!" moments.  I mean, why didn't I think of that?  Genius... pure genius.

Chocolate Sponge Cake with Chocolate Icing
adapted from bon appetit

1/4 cup Hershey's dark chocolate cocoa powder
1/4 cup cake flour
4 large eggs, room temperature - separate the yolks and whites from two of the eggs
1/2 teaspoon salt
1/2 cup plus 6 teaspoons sugar
1/2 teaspoon vanilla extract
1/2 teaspoon almond extract
Chocolate Icing:
1/2 cup heavy cream
2/3 cup dark chocolate chips

Preheat oven to 400 degrees F. Line 2, 8-inch round cake pans with parchment paper.  Lightly spray the bottom and sides (yes I do mean to spray the paper!) with cooking spray and dust with a bit of cocoa powder.  

Sift together the cake flour and cocoa powder, two times; set aside.  

In a large bowl, combine two of the whole eggs and two egg yolks, salt, 1/2 cup sugar and extracts; mix until it becomes thick and pale in color (about three minutes on medium speed).
In a second bowl, combine the two egg whites with one teaspoon sugar.   Whip egg whites to soft peaks then gradually add the remaining 5 teaspoons on sugar.  You aren't looking for stiff peaks, but for the egg whites to become thick and glossy.

Take half the egg white mixture and gently fold into the egg yolks.  Next, add half the flour/cocoa powder by sifting it, again, over the cake mix.  Repeat with the remaining egg whites and flour/cocoa powder mixtures.
 
This made just shy of four cups of cake batter.  I divided the batter between the two pans and baked for 15 minutes.  I almost over cooked it.... It went from being gooey in the center at 14 minutes to pulling from the sides at fifteen!  
Remove from oven and let cool 10 minutes before removing from pans.  

In a microwave safe bowl, heat the heavy cream  to just the point of boiling.  Remove from the microwave and add the chocolate chips and stir gently just to coat with the cream.  Cover with plastic wrap and let the heat of the cream melt the chocolate chips. It generally takes me close to five minutes for the mixture to smoothly blend.  9 out of 10 times this method works.  If the chocolate mixture isn't fully melted and smooth you may have to put it back in the microwave for a few more seconds.  Put a bit of the icing between the layers than pour the remaining over the top layer allowing it to just drip around the sides... it gives the cake some character :-)


Monday, May 28, 2012

Banana chocolate chip cookies

So if a cookie has bananas, wheat flour, wheat germ, and walnuts can I say I'm eating a well balanced diet?  Sigh... I didn't think so.  While my diet has been slightly altered over the past few months, I still have had to make cookies for the Walden House patients and staff.  These cookies are quite yummy and I added in a few other items to up the nutritional value.  I kept a few of the cookies on hand for my grand sweetie and wanted to feel semi guilt free for letting her eat cookies :-)  The texture is soft, but still very much cookie.  Give them a try, I know you'll like them!

Banana-Walnut Chocolate Chunk Cookies
adapted from Martha Stewart

1 cup all purpose flour
1/2 cup whole wheat flour
1 teaspoon kosher salt
1/2 teaspoon baking soda
3/4 cup unsalted butter, softened
1/2 cup granulated sugar
1/2 cup packed light brown sugar
1 large egg
1 1/2 teaspoons pure vanilla extract
1/2 cup mashed ripe banana
1 cup old fashioned rolled oats
1 tablespoon crushed flax seed
1 tablespoon wheat germ
8 ounces semisweet chocolate, coarsely chopped in 1/4-inch chunks
1/2 cup coarsely chopped walnuts, toasted

Directions: 
Preheat oven to 375 degrees F.  In a large bowl, cream together butter and sugars until light and fluffy.  Add egg and vanilla; mix well.  Blend in banana.
Combine the flours, salt, soda in a separate bowl and whisk together to combine.  Slowly add the dry mixture to the banana mixture and blend just to combine.  By hand, stir in oats, flax seed, wheat germ , chopped chocolate and walnuts.  
Drop dough by  tablespoons onto baking sheets line with parchmant paper or a silpat, two inches apart.
Bake until just golden brown, about 12 minutes.  Remove from oven and let cool five minutes on baking sheets before transferring to a a cooling rack.
Yields about 3 dozen cookies


Tuesday, February 21, 2012

Have the Cake Challenge: black and white cookies

Black and white cookies have always interested me.  Never having tasted one, I was just intrigued by the name, so when this month's Have the Cake challenge was to make either Black & White Cookies or Linzer cookies... well, of course I had to make the Black & White!  From what I understand, these cookies are quite popular in the North Eastern states, particularly New York. They are more cake like in texture rather than the crispy or chewy texture one would expect from a cookie.  I did a combination of two recipes, the dough from Smitten Kitten and the glaze  from Joy of Baking

Black and White Cookies
 Smitten Kitten's recipe which she adapted from a bunch of places, but mostly Zabar’s

1 3/4 cups granulated sugar
1 cup unsalted butter (2 sticks), at room temperature
4 large eggs
1 1/2 cups milk
1/2 teaspoon vanilla extract
1/4 teaspoon lemon extract
2 1/2 cups cake flour
2 1/2 cups all-purpose flour
1/2 teaspoon baking powder
1/2 teaspoon salt

Glaze:
from Joy the Baker
4 cups confectioners sugar
1/3 - 1/2 cup hot water
2 tablespoons light corn syrup
1/2 teaspoon pure vanilla extract
1 ounce (30 grams) bittersweet or semi-sweet chocolate, finely chopped 

Directions: 
 Preheat oven to 375 degrees. Spray 2 baking sheets with nonstick spray, or use a Silpat (silicone baking sheet).  I don't like to use parchment paper on sticky cookies but that is an option, too.

In large mixing bowl, combine sugar and butter; mix until fluffy.  Generally this takes 3-5 minutes, it will depend on room temperature, temperature of the butter. You can tell when they are “light and fluffy” by the appearance; it should be very light in color. Next, add the eggs, milk and vanilla and lemon extracts; mix until smooth.

In medium bowl, combine cake flour, all-purpose flour, baking powder and salt; gently whisk together.  Add dry mixture to the wet in batches, stirring well after each addition. 

Place heaping spoonfuls of the dough 2 inches apart on the baking sheets;bake until edges begin to brown, 18 to 20 minutes. Let cookies cool completely.

Glaze:
Place the confectioners sugar in a large bowl. Gradually Stir in the hot water (it is best to pour in a bit at a time so that you can keep track of its consistency easier), add corn syrup,and vanilla extract, stirring constantly, until the mixture is thick, smooth, and of spreading consistency. Add more sugar or water if necessary to get the right consistency.

Remove about 1/2 cup (120 ml) of the frosting and place it in another bowl. In a small microwavable bowl, add the finely chopped chocolate. Melt on high for about thirty seconds; stir. Add the melted chocolate to the 1/2 cup frosting.

Turn the cookies so the flat bottoms are facing up. Spread white glaze over half the cookie. Repeat with the remaining cookies. If the frosting/glaze thickens too much, add a few drops of water.

Once all the cookies are covered with the white frosting, then cover the other half of each cookie with the chocolate frosting. If the chocolate frosting becomes too thick, add a little hot water to thin the frosting.


Tuesday, February 7, 2012

Mom's Crazy Cooking: Gaga’s Chocolate Mayonnaise Cake

Strange as it may seem, I am more of a cupcake gal than a cake gal.  Weird since it is the same batter.  I think it has to do with guilt... compared to a layer cake a cupcake is much smaller.  Possibly I am just trying to fool my thighs but in the end it all goes there any way.  Mom's crazy cooking challenge for February was to make a chocolate layer cake.  Sounds simple enough doesn't it. For me the challenge is not making the reicpe, it is finding one. We are not supposed to use a "professional" blogger's recipe.  But I can think of worse things to do than having to browse through all of the wonderfully put together blogs out there!
My daughter suggested making a mayonnaise cake.  I've heard of them but never tasted one. My search led me to Amber's blog Bluebonnets and Brownies.  Her blog is awesome!  She shared a recipe for her Gaga's Chocolate Mayonnaise cake.  It doesn't have much of a rise to it and in many ways reminded me of our family's egg-less Wacky Cake.  It was very moist and layered beautifully.  I frosted using my favorite go to chocolate frosting that uses flour

Bluebonnets and Brownies: Gaga's Chocolate Mayonnaise Cake
2 cups all purpose flour
1 cup sugar
6 tablespoons cocoa
1/4 teaspoon salt
2 teaspoons baking soda
1 cup mayonnaise – no substitutes
1 cup cold coffee  ( I used espresso)
1 teaspoon vanilla

Directions
preheat oven 350 degrees F.
Sift together dry ingredients – set aside.
In mixing bowl combine mayonnaise, cold coffee and vanilla; add the sifted ingredients 1/3 at a time.  Beat until mixture is smooth Pour into 2 greased and floured 9-inch cake pans. Bake 25 to 35 minutes taking care not to over bake.

Photobucket


Wednesday, December 21, 2011

Blue Ribbon Almond Roca Cookies


Hands down Almond Roca Candies are my all time favorite.  I don't buy it any more since I tend to eat most of it.  But when I saw this cookie recipe, in  my Food Network Magazine, I knew that I just had to make it. Its got all the flavors of the candy.  A definite winner recipe!
Blue Ribbon Almond Roca Cookies

Ingredients

2 1/2 cups all-purpose flour
1/2 teaspoon baking soda
1/4 teaspoon salt
1 cup dark brown sugar
1/2 cup sugar
1 cup butter, room temperature
2 eggs, room temperature
2 teaspoons pure vanilla extract
1 package toffee bits
1 cup coarsely ground almonds
4 ounces milk chocolate
1/2 tablespoon vegetable oil

Directions
Preheat oven to 300 degrees F.
In a medium mixing bowl, whisk together flour, baking soda, and salt. Set aside. 
In the bowl of an electric mixer, blend sugars together on medium speed. 
Add butter and mix to form a grainy paste. 
Add eggs and vanilla and mix at medium speed until light and fluffy. 
At low speed, slowly add the flour mixture and then the toffee bits. 
Mix until just blended; do not over-mix.

Place ground nuts in a small bowl. 
Using hands, roll balls of dough into 1 to 1 1/2-inch balls,
 then roll in the ground nuts. 
Place on cookie sheets several inches apart.
 Bake approximately 22 minutes and then transfer cookies to a cooling rack.

Melt the chocolate with the vegetable oil in a double boiler
or in a bowl set over a pan of simmering water. 
Drizzle melted chocolate over cooled cookies. 
Place cookies on a cookie sheet and place in freezer 
or refrigerator until chocolate is firmly set.

Tuesday, December 20, 2011

Easy Chocolate Turtles


Nothing new really. This candy has been seen on the Internet for several years now, 
but that doesn't stop me from sharing these highly addictive treats!  

You just take these ingredients:
1 bag of Rolo candy 
1 bag of M&M’s or pecan halves 
1 bag of pretzels (knots, squares or rounds)

Place the pretzels on a foil lined baking sheet. Unwrap the Rolos and set one on top of each pretzel. 
 Pop it into the oven at 250 degrees for about 4 minutes. 
 The Rolos will look about the same, but that’s long enough to make them soft. 
 Gently place and M&M or pecan on top of each Rolo and press down a bit. 
 Let them cool completely.

Wednesday, December 7, 2011

Crazy Cooking Challenge:Dark chocolate Kahlua Mudslide Fudge


Once again Tina, from the Crazy Cooking Challenge, has given us a task: find a blog that has fudge and recreate it.  Oh my but there are so many wonderful sounding fudge recipes out there!  I wanted to try them all, but my thighs stopped me.  On Pinterest I had pinned a recipe for Kahlua fudge.  This recipe had been pinned many times. I don't expect that I am the only one that will make this recipe, but I did make some adjustments that may separate me from the others.

 Before I get to those changes, please give a big thanks to La Phemme Phoodie.  She has a wonderful blog that just so happened to feature these delectable bits of fudge-y happiness! Click on the above link and give her some blogger love!
This fudge is fantastic.  Its creamy, and not overly sweet.  Even my mom, who dislikes dark chocolate, gives it two thumbs up!  I added a teaspoon of espresso powder right before I added the chocolate.  The original recipe calls for 3 cups total of chocolate but I only did 2 cups and I omitted the nuts (yes dear, I did that for you sweet husband of mine!)  be sure to click on her link to see the original recipe!


Kahlua Creamy Fudge (Adapted from La Phemme Phoodie)
INGREDIENTS:
1 1/3 cup granulated sugar
1 (7 0z) jar marshmallow creme*
2/3 cup evaporated milk
1/4 cup salted butter
1/3 cup Kahlua Mudslide
1/4 teaspoon salt
1 teaspoon espresso powder
2 cups semi-sweet chocolate pieces
1 teaspoon vanilla

DIRECTIONS:
Line an 8 inch square pan with baking foil.or parchment paper.
In a 3 1/2 quart saucepan combine sugar, marshmallow, milk, butter, Kahlua and salt. Bring to a rapid boil, stirring constantly for 5 minutes. Remove from heat; add the espresso powder and chocolate. Stir until melted. Add vanilla. Turn into prepared pan.
Cool on wire rack for 30 minutes and then refrigerate until firm. To serve cut into squares.
Serving: Approximately 2 1/2 pounds

 Here's a tip; make the length of the foil, or parchment, a bit longer  This way all you need to do is cut around the pan and pull out the fudge!.


Tuesday, December 6, 2011

Make it yourself candy: Butterfingers


I try to be good with my eating during most of the year. Yes, I have a sweet tooth, but I really do try to limit myself.  Come Christmas time, though, I go full out in the candy mode.  I love making candies! There is just something so lovely about seeing a plate of glossy chocolates.  
Lately, however, I have been experiencing signs of aging (I guess that's what happens when you are in your 40's) and standing at a stove plays havoc with my fibromyalgia. So when I see a recipe for candy that uses minimal ingredients and is quick to make, I am all over it! 

Candy Corn Butterfingers
adapted from Taste of Home forums
1 lb. candy corn
16oz jar peanut butter (I used a generic brand of  peanut butter)
16oz good quality chocolate, tempered  ( I cannot stand the stores chocolate coatings but they will work if you want to go that route) 

Melt candy corn in microwave on high 1 minute. Stir and continue cooking in 15-second intervals til melted, stirring after each interval. Stir in peanut butter. Spread mixture in an 8x8 pan lined with parchment. Cool completely. Cut into squares. Dip in melted chocolate candy coating. Lay on waxed paper to set.
Note: I made mine using the stove top with a double boiler.  It worked great!

Friday, December 2, 2011

Chocolate Chiffon Pie


Since darling hubby dislikes fruit (I know!!! How unfair is that!!!) I make him a chocolate pie during the holidays.  He will eat pumpkin pie and lemon meringue pie as well, but chocolate is his favorite.  I've got a recipe I've always used for chocolate cream pie (courtesy of Betty Crocker) that I've always made in the past but this year I wanted to try a different recipe.  I thought I would give the Chocolate Chiffon Pie a try that is in my Fannie Farmer Cookbook.  While chocolate cream pie uses cornstarch as a thickener, the chiffon pie relies on plain gelatin.  The pie was rather luscious.  I used a simple graham cracker crust, but it would work in a precooked pastry crust, cookie crust, or whatever other crust you crave.

Chocolate Chiffon Pie      
adapted from Fannie Farmer Cookbook
Graham Cracker Crust
 1 1/2 cups fine graham cracker crumbs
1/3 cup sugar
1/3 cup melted butter.

Chocolate Chiffon
4 eggs, separated
1 and 1/2 cups milk
1 envelope PLAIN gelatin (Knox brand is what I used)
1/2 cup sugar
1/4 tsp. salt
6 tablespoons unsweetened cocoa, sifted
1 teaspoon pure vanilla extract

Directions
Preheat oven to 350 degrees F.
Mix the crumbs, sugar and butter together in a bow.  Press the crumb mixture into a 9 inch pan, including up the sides.  Bake 8-10 minutes; or until lightly toasted.
Using a heavy 2 quart pan, pour in the milk and sprinkle gelatin over it; let soften for about 3 minutes.  Add the sugar, salt, and egg yolks to the milk mixture and beat with beater to blend thoroughly. Cook and stir over low heat until slightly thickened (do not boil); add the cocoa and mix completely.
Remove from heat. Chill until thickened slightly further.

Meanwhile, beat the egg whites until they stand in soft peaks–like you would for a meringue. GENTLY fold beaten whites into the chocolate mixture–you want there to be plenty of air bubbles, and yes, it will look a little strange.  Spoon into prepared crust and chill until ready to serve

Monday, November 14, 2011

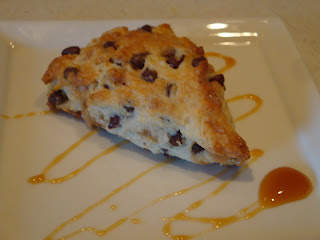
November SRC; Chocolate Toffee Cream Scones


Yippee!  Its reveal day for Group B of the Secret Recipe Club!  Now I can tell you who my new found friend is... Fallon, of Fallon's Cucina.   She has this amazing blog inspired by her love of healthy eating and fitness.  I know. I know.  If you are familiar with my blog you know that my inspiration comes from sweets and chocolate, but who says the two worlds can't collide? Although, this time I couldn't help but gravitate towards one of her few recipes that are a bit less healthy.  I can't help it.  Sorry, scones and I are just a match made in heaven! Not that I won't ever try her healthier dishes.  I mean, come on!  Doesn't Cantaloupe Wrapped in Prosciutto sound heavenly?  What about Sweet Potato Oatmeal?  That just has major YUM written all over it!

Secret Recipe Club is the genius idea of Amanda Formaro.  SRC has grown so large that there are now four groups.  Each week one group has a reveal day to which each member, of that group, can announce to the world which blog they have been secretly given to follow and create a recipe from.  There are some amazing blogs out there!  Be sure to check out the links at the bottom and see what everyone else has been cooking up!
Chocolate Toffee Cream Scones
(adapted from Katrina: recipe from Paige Vandegrift)
Ingredients
1 cup all purpose flour
1 1/2 teaspoons baking powder
1/8- 1/4 teaspoon salt (I used kosher salt)
1/8 cup granulated sugar
1/2 cup heavy cream (plus a little more for brushing on the tops)
Few drops of pure vanilla extract
1/4 cup toffee Bits (Hershey's Heath)
1/4 cup mini chocolate chips ( Nestle Toll-house Semi Sweet)

Combine the flour, baking powder, salt and sugar in a bowl. Whisk to blend well. Add the heavy cream (no cream? See my tip at the end!) and vanilla. Stir into dry ingredients with a rubber spatula while pouring the cream, continuing to stir until a soft, sticky dough is formed. Turn dough out onto a lightly floured surface and knead briefly (8-10 times). Pat the dough into a circle 1/2" to 3/4" thick. Cut the circles into 8 wedges and place the wedges an inch or so apart on a parchment-lined baking sheet.
Bake at 425°F until golden brown, about 13 minutes. Remove from oven, cool for a few minutes and then transfer to wire rack and cool... or do like we did and eat them fresh from the oven!

*Tip:  If you do not have any heavy cream on hand, substitute with 3 tablespoons melted butter mixed with 6 tablespoons milk.


Monday, October 24, 2011

Chocolate Fudge Butterfingers Cookies


Butterfinger candy bars are absolutely wonderful!  I know that there are people out there that disagree and we are all entitled to our opinions :-)  Someday I would like to try and recreate the candy bar itself, but for right now I am not that ambitious.
Blog hopping, I came across a recipe for Butterfinger cookies and I just knew that I had to give the recipe a go.  I went to the store and bought three candy bars.... the recipe called for two but I had to make sure that they were a quality product, didn't I? I even ate the candy bar in the parking lot. I had to be sure that I was getting the best available!
Once home I set about following the recipe and was pleased with the ooey, gooey, chewy outcome.  I'll be looking for Halloween candy clearance sales to see if I can get a deal on more candy bars.... this is a keeper recipe!
I found the recipe for Chocolate Fudge Butterfingers at barbarabakes.com .  She posted this recipe as part of a twelve weeks of Christmas Cookies Blog Hop.  I spent a bit of time browsing through her blog.  She is also a daring kitchen baker so she and I have that in common.  I fully credit this to her (which she adapted from the Picky Palate) and she would be thrilled if you made it and thanked her for the recipe (here)!  I did change the recipe slightly and you can see my changes written in the italics.
Chocolate Fudge Butterfinger Cookies
slightly adapted from Picky Palate
1 3/4 cups flour1 1/4 cups cocoa powder (I used Hershey's Special dark  cocoa)
2 tsps. baking soda1/2 tsp. salt
1 cup (2 sticks) unsalted butter, softened
1 cup granulated sugar    (I reduced sugar to 3/4 cup)
3/4 cup brown sugar
2 eggs1 tsp. vanilla
2 Full size Butterfinger Bars, crushed
1 1/2 Cups semi sweet chocolate chips

Directions
Preheat oven to 350 degrees F. and line cookie sheets with parchment or silpat liners.In a medium bowl, combine the flour, cocoa, baking soda and salt. Set aside.In a large bowl, cream together the butter and sugars until light and fluffy. Add eggs one at a time. Add vanilla and mix until well combined
Stir in flour mixture until just combined. I did the dry mixture in three additions just so I wouldn't have a floury mess with my stand mixture.  Then stir in crushed Butterfinger and chocolate chips.
Using a medium cookie scoop, drop by rounded spoonfuls onto prepared cookie sheets. Bake for 9-11 minutes, should still be soft in center. Allow cookies to cool on baking sheet for 5 minutes before removing to a wire rack to cool completely.
Yields 3 dozen cookies

Sunday, October 23, 2011

Chocolate Whopper Cookies


Hi, my name is Vivian and I am a chocoholic.  Well, chocolate is just one of my addictions... I have a serious sprinkle addiction too.  But today we will focus on my chocolate- really, focus Vivian, focus (Now I want to get up and grab a handful of whoppers!).  I recently bought some Carnation Chocolate Malt powder.  I cannot for the life of me remember why I bought it.  I suppose a recipe popped up that looked good but I haven't a clue which one it might have been.  Organization has to become one of my goals.....sigh.
In any case, I had this malt powder and felt it was time to use it.  Several recipes popped up on Google that used malt powder or extract but they seemed flat. Not quite what I was looking for.  Plus, most didn't include Whoppers and it just wouldn't be any fun to not include those!  Further research led me to All Home Made Cookies which had a Chocolate Malt Cookie that used malted milk balls but not the powder.  If I didn't get those cookies made soon all my Whoppers were going to be gone.  I decided to just revamp their recipe and they turned out quite yummy!       

                    
 Chocolate Malt Cookies
adapted from AllHomemadeCookies.com
Ingredients:
3/4 c. sugar
3/4 c. butter, softened
1/2 tsp. vanilla
1 egg
1 1/4 c. Pillsbury Best® All Purpose Flour
1/4 cup Carnation Chocolate Malt Powder
2 T. unsweetened cocoa
1 tsp. baking powder
1/4 tsp. salt
2 T. sugar
42 chocolate malted milk balls

 Directions:
Cream together 3/4 c. sugar and butter, in a large mixing bowl. 
Add vanilla and egg, blending well. Add the next 5 ingredients and mix until blended well. 
Shape dough into 1-inch balls and roll around in remaining 2 T. of sugar until lightly coated.
Place cookie balls onto an ungreased cookie sheet(I prefer to use parchment paper) and bake for 7-10 minutes at 400 degrees, or until edges are set.
Remove cookies from oven and press 1 malted milk ball into the center of each cookie. 
Cool for 2-3 minutes and remove from pan.
Makes about  3 1/2 dozen cookies

Saturday, October 22, 2011

The cookie Carnival


Fudgy Cats was the selection I made for this months Cookie Carnival (found at midwest living. com).  To be honest, the fudgy brownie was just "eh".  You know, the not bad but not exceptional either type. I like the idea of cutting out cats, or in my case spiders, but I would not make this recipe again.  While not every cookie (or brownie) recipe is a success story, I have found several "keeper" recipes through the Cookie Carnival.   Tami does a fantastic job keeping the momentum going and we are always on the lookout for members.  Come check her blog out here!

Fudgy Cats
1 cup all-purpose flour
3/4 cup unsweetened cocoa powder
1/2 teaspoon ground cinnamon
1/4 teaspoon salt
2 cups granulated sugar
1 cup butter, melted
3 eggs
1 teaspoon vanilla
1/3 cup powdered sugar
2 teaspoons unsweetened cocoa powder1 teaspoon miniature semisweet chocolate pieces

Directions

1. Line a 15x10x1-inch baking pan with foil. Grease the foil; set pan aside.
2. In a small mixing bowl, stir together the flour, the 3/4 cup cocoa powder, cinnamon and salt.
3. In a large mixing bowl, combine granulated sugar and melted butter. Stir in eggs and vanilla. Add the flour mixture to butter mixture and stir until combined.
4. Spread evenly into the prepared pan. Bake in a 350 degree F oven for 25 minutes or until a toothpick inserted near center comes out clean. Cool in pan on wire rack. Cover and chill 3 to 24 hours.
5. Uncover the brownie layer. Lift from pan using foil. Cut into cat shapes using a 3-inch cookie cutter or a knife. In a small bowl stir together the powdered sugar and 2 teaspoons cocoa powder. Sprinkle over cat cutouts. Press 2 chocolate pieces into each cutout for the eyes. Makes 14, 3-inch cookies.

Monday, October 17, 2011

have the cake challenge:carbonation


I've not been inspired to bake with carbonation as other food items I have tried, using soda, have been sickeningly sweet.  However, our Have the Cake challenge for October was to bake an item using carbonation.   I had cola, root beer and mountain dew in my pantry and since plain old cola seems... well, face it - plain old cola is boring! I remember parents panicking the time my husband brought Mountain Dew to the classroom and didn't want that reaction again.  That left me with the root beer. Many of the recipes I found used cake mix and or root beer extract, neither of which I wanted to use.  Thankfully I came across this recipe at The Prepared Pantry and went about getting the cake made.  I'm a batter licker... I know, I know, food illness ect... but I just can't help myself!  It had a mild, but yummy, taste of root beer.  I suppose that the mild flavor was due to my substituting vanilla extract for the root beer flavoring.  I made a butter cream frosting and topped with some pop rocks.  My Sunday school kids are going to love this!
Note:  The cupcakes rose beautifully and then flattened out. I'm not sure what caused it.  I ended up having to cut the cupcakes out of the pan by cutting off the flattened tops.  Utter failure.  But they did frost up beautifully and they tasted really good

Root Beer Chocolate Cake Recipe
3/4 cup shortening
1 3/4 cups granulated sugar
2 large eggs
1/2 tablespoon root beer flavor (or vanilla but will not have as deep of root beer flavor to the cake)
2 2/3 cups all-purpose flour
1/4 cup Dutch-processed cocoa
1/2 teaspoon salt
1 teaspoon baking soda
1/2 cup buttermilk
1 12-ounce can root beer, not sugar-free

Preheat the oven to 350 degrees.
 Cream the shortening and sugar together. Add the eggs one at a time, beating well after each. Beat for five or six minutes so that the mixture is light and fluffy. Add the extract.
In another bowl, mix the flour, cocoa, salt, and soda together.
In three or four additions, alternately add the dry ingredients and the liquids to the creamed mixture starting and ending with the dry ingredients. Mix only until smooth.
Pour the batter into the prepared pan. Bake a 9x13 inch pan for 35 to 40 minutes, cupcakes for 15 minutes, or until the cake tests done with a toothpick. Cool completely before frosting with the frosting of your choice.
Baker’s Note: When making a cake such as this, you are mixing oil (shortening) and water (soda pop and buttermilk)—which don’t mix. The egg yolks act as an emulsifier, a bonding agent between the oil and water molecules and the flour absorbs much of the water. That is why you start with the flour addition—so that the water doesn’t overload the fat mixture before the flour is there to start absorbing water. It’s also why you add the liquids in stages between the flour additions.

Friday, October 7, 2011

Crazy Cooking Challenge: Chocolate Chip Cookies


I love challenges and even more than that, I love being able to showcase another persons blog. With the Crazy Cooking Challenge, we are given a recipe subject (this month is chocolate chip cookies) and from there we are to just find an intriguing recipe showcasing another persons blog. This is the second month Crazy Cooking Challenge has been in place and I'm just thrilled to now be a part of it. Check it out here to see last months challenge of Macaroni and Cheese!

I've got a new blog obsession with Kristy over at Sweet Treats and More. Here photographs are phenomenal and she just has a nice relaxed way of writing. She has several tasty looking recipes using chocolate chips, but I have thus far contained myself to making the Classic Oatmeal Chocolate Chip Cookie. They were delicious! My boys and hubby just gobbled them up!

Classic Oatmeal Chocolate Chip Cookies
from Sweet treats and more

1 c. butter
1 c. brown sugar
1 c. granulated sugar
2 eggs
1 tsp vanilla
1 tsp baking soda
1 tsp baking powder
1 tsp salt
2 c. flour
2 3/4 c. oatmeal
2 c. chocolate chips

Cream together the butter and sugars. Add eggs and vanilla. Beat until light and fluffy. Add baking soda, powder, and salt and mix. Add flour, oatmeal and chocolate chips. Mix until combined. Bake at 350 degrees for 10-12 minutes.

Photobucket
>


Friday, September 9, 2011

Icebox Cake... ish

This month our Have the Cake challenge was to make an Icebox Cake. I had never heard of an Icebox cake and the process certainly was intriguing.  I didn't follow any set recipe and I didn't exactly use cookies either.  During our last vacation, Neil and I went to a Russian grocer store.  On the shelf were these packages of thin wafers, about 1o to a package.  We bought a package with the intent on figuring out how exactly it was used in  Russian recipes.  While we have exactly figured that part out, but we did have success with using it in our version of the icebox cake.
These are the wafer layers... please, if you have any idea how they are supposed to be used, do tell! 
I did alternating layers using ganache and a whipped cream/cream cheese mixture.
I iced the cake with the remainder of the cream cheese/whipped cream mixture and then sprinkled on mini chocolate chips.  We were too impatient to let it set over night, but we did wait a good eight hours! Turned out to be super yummy!


      Icebox Cake
1 package dry wafer sheets
3 cups whipping cream
6 tablespoons confectioners sugar
8 ounces cream cheese, softened
2 teaspoons vanilla extract
2 cups semi sweet chocolate chips
2 1/2 tablespoons whipping cream

Directions:
In a medium bowl, add whipping cream and confectioners sugar, mix until soft peaks form.  Add vanilla and mix once more.
In a small bowl,  mix softened cream cheese until whipped.  Gently fold into whipped cream.
Melt together the chocolate chips with the 2 1/2 tablespoons whipping cream; blend until smooth and creamy.
Take one wafer and top with a good sized dollop of whipped cream/cream cheese mixture; smooth over wafer. Repeat making three layers. On the top of the third wafer, spread some of the chocolate ganache mixture.  Follow this with another layer of the whip cream mixture and alternating with chocolate layers until you have three wafers remaining.  For the final three wafers use only the whipped cream mixture. 
Ice cake with remaining whipped cream.  Sprinkle with mini chocolate chips, if desired.
Refrigerate over night. Keep leftovers in refrigerator.