Wednesday, November 30, 2011

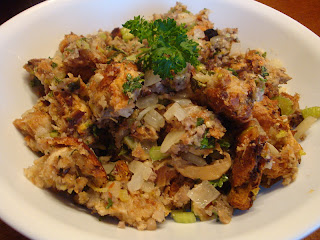
Easy Sausage Stuffing


What I like best about stuffing is the top part that gets all crunchy!  Don't get me wrong, I eat all of the stuffing. Its just that the crispy topping is just so yummy!  For the past nine years I have been making a variation of this stuffing recipe.  Not much really changes, sometimes I use fresh herbs and other times I use dried.  If my kids are going to eat it then I leave out mushrooms and  I will cook the onions and celery in a bit of butter before adding to the stuffing. Sometimes I add dried cranberries, too.  The bread is pretty much whatever I find I have on hand.  This time I used a whole grain bread but it works great with sour dough, rye, whole wheat or even the cheapie white bread you get at the grocery store. I have used this inside a turkey but mostly I make it on the side because I like to stuff my turkey with fresh herbs and lemon.  Besides, I get more of the crunchy topping when its cooked separately!
Sausage Stuffing
2 pounds bread, cut into chunks
1 package Jimmy Dean Sage Sausage
1 medium onion, diced
3 stalks celery, diced
8 ounces fresh mushrooms
1/4 cup chopped fresh parsley
3 stems of fresh thyme, leaves removed
1 sprig of rosemary, chopped
1 can (14 1/2 ounce) Swanson Chicken broth  ( or use your own homemade broth)

Directions:
Cook and drain sausage, crumble.  In large pot add sausage, cubed bread, onions, celery and seasonings; stir until evenly moistened.
Bake at 325 degrees F or 30 minutes covered.  Uncover and bake 15 minutes more

Monday, November 28, 2011

Cheddar Yeast Rolls


They say that you are never supposed to try out new recipes on special occasions or for guests... I think that's half the fun!  I get Paula Deen's weekly e-mail newsletter and this week was a recipe for Smoked Cheddar Rolls.  I was intrigued enough to give the recipe a try for Thanksgiving, although I couldn't get my hands on any smoked cheddar.  I substituted sharp cheddar for the smoked cheddar and it was pretty.  I went for the clover look and won't likely do that again- bah, too much work!  I would make them into my basic roll shape( Round balls nestled together in a 9x13-inch pan) so that it would have more soft areas and not so much crust.


Cheddar Yeast Rolls
Makes 18 rolls
recipe from Paula Deen

2 (1/4-ounce) packages active dry yeast
3 tablespoons sugar
1/2 cup warm water (105° to 115°)
2 cups whole buttermilk
1/2 cup butter, melted
1 large egg
2 teaspoons salt
6 to 7 cups bread flour, divided
2 cups shredded sharp Cheddar cheese
Melted butter (optional)

In a small bowl, dissolve yeast and sugar in 1/2 cup warm water; let stand for 5 minutes. In a large bowl, beat buttermilk, melted butter, egg, and salt at medium-low speed with a mixer until combined. Add yeast mixture, beating until combined. Gradually add 4 cups bread flour and shredded cheese, beating until smooth. Beat in enough remaining bread flour to make a soft dough.

On a lightly floured surface, turn out dough. Knead dough for 6 to 8 minutes or until dough is smooth and elastic. Place dough in a lightly greased bowl, turning to grease top. Cover, and let rise in a warm place (85°), free from drafts, for 1 hour or until dough is doubled in size.


Spray 18 muffin cups with nonstick cooking spray.
Shape dough into 54 (1 1/2-inch) balls. Place 3 balls in each muffin cup. Cover, and let rise in a warm place (85°), free from drafts, for 1 hour or until doubled in size.

Preheat oven to 350°.
Bake for 12 to 15 minutes or until lightly browned. Brush hot rolls with melted butter, if desired. Let cool in pans for 5 minutes. Serve warm.

Sunday, November 27, 2011

Daring Bakers Challenge: Sans Rival


One thing I like about being a daring baker is that I'm introduced to recipes from other countries. Doesn't hurt that those recipes are desserts either :-)  I love meringue and this recipe uses that and a french butter-cream.   And yes, you are quite correct in thinking that this produces a very rich dessert!

Blog-checking lines: Catherine of Munchie Musings was our November Daring Bakers’ host and she challenged us to make a traditional Filipino dessert – the delicious Sans Rival cake! And for those of us who wanted to try an additional Filipino dessert, Catherine also gave us a bonus recipe for Bibingka which comes from her friend Jun of Jun-blog.


Sans Rival
Servings: 12
10 large egg whites, room temp
1 cup (240 ml) (225 gm) (8 oz) white granulated sugar
1 teaspoon (5 ml) (3 gm) cream of tartar
2 cups (480 ml) (240 gm) (8½ oz) chopped, toasted cashews, divided  
I used toasted almonds instead of  cashews

Directions:
1. Preheat oven to moderate 325°F/160°C/gas mark 3.
2. Line cake pan bottoms with parchment paper and butter and flour the sides really well.
3. In a large clean, dry glass or metal mixing bowl, beat egg whites on medium until foamy (2 mins.). Sprinkle with cream of tartar. Gradually add sugar, a couple of tablespoons at a time, continuing to beat now at high speed until stiff shiny peaks form. (about 7-10 mins.)
4. Fold in nuts 1 cup finely chopped nuts
(Note the more finely ground for folding into meringue. The coarsely ground for is decoration of finished cake.)
5. I traced circles to make smaller individual servings rather than 4 large cakes.  Using a pastry bag, I filled in the 32 circles.  Be sure to flip the paper over and not bake on the side with the pencil!
6. Bake in preheated oven for 30 minutes, or until golden brown. Remove the meringue from the baking pans while still hot; allow to cool slightly. Peel off the parchment paper while it is still warm, it is difficult to remove sometimes when they have completely cooled.
7. When cool, trim edges so that all 4 meringue layers are uniformly shaped. Set aside.

French Butter-cream:
5 large egg yolks, room temperature
1 cup (240 ml) (225 gm) (8 oz) white granulated sugar
1/4 cup (60 ml) water
1¼ cup (300 ml) (2½ sticks) (285 gm) (10 oz) unsalted butter, room temperature
Optional Flavorings: 2 oz (55 gm) unsweetened chocolate, melted, or 1½ teaspoon (7 ½ ml) almond extract, or 1½ teaspoon (7 ½ ml) vanilla extract, or any flavor you like

Directions:
1. Put the egg yolks in a mixing bowl. Beat at high speed until the yolks have doubled in volume 
and are a lemon yellow.
2. Put the sugar and water in a heavy pan and cook over medium heat, stirring the sides down only until all the sugar is dissolved and the syrup reaches 235°F/112°C (or thread stage).
3. With the mixer on high, very slowly pour the syrup down the sides of the bowl, until all has been added. Be careful as the very hot syrup could burn you if it splashes from the beaters. Continue beating on high until the mixture is ROOM TEMPERATURE (about 15 mins). Still on high, beat in the soft, room temperature butter a tablespoon at a time. Add flavoring after you beat in the butter. Refrigerate the buttercream for at least an hour, and whip it smooth just before you use it.
Assembly:
Set bottom meringue on cake board with a dab of butter cream to hold it in place. Spread a thin layer of buttercream and then place another meringue on top. Repeat with a thin layer of buttercream, meringue, thin layer of buttercream, meringue, and finally buttercream the top and sides. Decorate with reserved nuts.

Refrigerate until ready to serve. It is easier to cut cold. May freeze.

Friday, November 25, 2011

Caramels


Next to baking, making candies is an all time favorite thing to do.  However, I have a confession to make... I absolutely hate having to wrap candies!  BORING!  The sad fact is, if you don't wrap some candies, caramels for instance, you have nothing but one big sticky mess.
This recipe has been in my family for years and is from an old candy making book (How to Make Candy; Culinary Arts Institute 1983). If you like soft chewy caramels then this is the recipe to try.
Caramels
2 cups sugar
1 1/2cups light corn syrup
2 cups evaporated milk (I use the skim evaporated milk and works just fine)
1/2 cup margarine
1 teaspoon vanilla

Combine sugar and corn syrup in heavy saucepan.  Stir occasionally and heat to 300 degrees F.  Add evaporated milk and margarine.  Stirring continuously, cook to 250 degrees F.  Remove from heat and add vanilla.  Pour onto a lightly buttered baking sheet.  Cut and wrap individually in wax paper.

Wednesday, November 23, 2011

Thyme Gougères

Were you supposed to bring an appetizer for Thanksgiving and forgot about it?  Have no fear!  This is a quick and easy recipe that is sure to impress.
I found the original recipe on Bon Appetit and made some adjustment using what I had on hand.  My daughter and son in law loved them! 
Thyme Gougères
adapted from bon appetit
Ingredients
1/4 cup (1/2 stick) unsalted butter
1 cup all-purpose flour
Large pinch of cayenne pepper
Large pinch of kosher salt
1 cup grated sharp cheddar
1/2 plus 3 tablespoons cup grated  Parmesan regiano cheese
2 teaspoons fresh thyme leaves plus more for garnish
5 large eggs

Preparation
Preheat oven to 400°. Line 2 large baking sheets with parchment paper. Bring butter and 1 cup water to a boil in a large heavy saucepan. Remove from heat.
 
 Add flour, cayenne, and salt; stir vigorously to blend. Return to heat; stir vigorously over medium heat until mixture forms a ball and a thin, dry film forms on bottom and sides of pan, about 1 minute.
Transfer mixture to a stand mixer fitted with a paddle attachment. Add 4 eggs, one at a time, fully incorporating each egg between additions, and scraping down sides of bowl as needed.Add 1 cup sharp cheddar and 1/2 cup parmesan regiano cheese, and 2 tsp. thyme; beat on low speed to blend. 
Spoon dough into a pastry bag fitted with a 1/2" tip or a plastic bag with 1/2" cut diagonally from 1 corner. Pipe dough onto prepared baking sheets in 1"–1 1/4" rounds, spacing 1" apart. For the record, I am quite lazy and just spooned out the dough using my tablespoon cookie scoop! 
Whisk remaining egg with 1 Tbsp. water in a small bowl. Brush egg wash lightly over rounds, patting down to form rounded tops. Sprinkle with remaining 3 Tbsp.Parmesan. Garnish each with a few thyme leaves.
Bake gougères until puffed and golden brown and centers are cooked through but still moist, 20–25 minutes. Let cool slightly and serve. DO AHEAD: Can be made 1 month ahead. Let cool completely. Store airtight in freezer. Rewarm in 325° oven until hot, 10–15 minutes.

Thursday, November 17, 2011

Easy Chicken Parmesan


Lately I have been obsessed with Pinterest.  I know, just what I need... another obsession.  I could stock pile recipes and ideas all day long. Sure, 90% of them will never get done.  Never mind the harsh reality that if I stopped following everyone's blogs and pins there would be actual time to do those things!

My daughter and son-in-love (law just seems so rigid, we have chosen to love this dear man!) were coming over for dinner and I wanted to have a meal that would be fairly easy to manage.  Although there are some things I would change next time I make it, over all it got high flavor scores.
I found this recipe off of Pinterest.  It was originally pinned from Food Wishes  which gives a great video of how to make this easy meal. In fact, this is what he does; Video Recipes.  There are tons of things I want to try out on his blog.. If you do try this recipe please visit Chef John's blog and thank him!
 Notes:  My topping looks burned.  It didn't bother the flavor a bit but does make the picture a bit icky looking.  I would cover this dish with tinfoil for about half the cooking time to prevent this from happening again. Everyone would have like a bit more sauce, so I would actually increase the marinara by another cup.  I encourage you to try the recipe first as is.  It was absolutely delicious!

Easy Chicken Parmesan
Recipe from Foodwishes.com
Ingredients: 
2 tbsp olive oil 
2 cloves garlic, crushed 
hot red pepper flakes, to taste 
6 boneless skinless chicken breasts (I used 5, but they were huge!) 
2 cups marinara sauce 
1/4 cup chopped basil 
8 oz mozzarella, shredded 
4 oz Parmesan, grated 
1 (5-oz) package garlic croutons

Directions:
Preheat oven to 350 degrees F.
Place the olive oil in the bottom of a 9-in x-13-inch pan.  Sprinkle garlic and red pepper flakes 
over the olive oil. 
Place chicken onto the olive oil. I cut my chicken breasts in half because they were quite big.  
Pour Marinara sauce over all the chicken pieces
Place chopped basil over chicken. (I had to use dried)
Sprinkle 2 ounces of Parmesan cheese over the top.
Sprinkle 4 ounces of shredded mozzarella.
Cover with the garlic croutons.
Finish off the topping by covering with the remainder of the Parmesan and Mozzarella cheese.
Bake for 30-40 minutes.  It is important to use your meat thermometer to make sure that your thickest piece of breast meat reaches 165 Degrees F.

I served ours with angel hair pasta that was drizzled that was tossed with fresh minced garlic and olive oil.

Monday, November 14, 2011

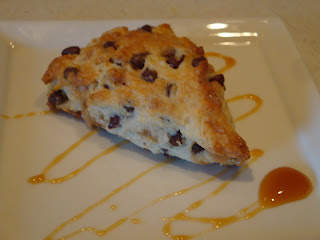
November SRC; Chocolate Toffee Cream Scones


Yippee!  Its reveal day for Group B of the Secret Recipe Club!  Now I can tell you who my new found friend is... Fallon, of Fallon's Cucina.   She has this amazing blog inspired by her love of healthy eating and fitness.  I know. I know.  If you are familiar with my blog you know that my inspiration comes from sweets and chocolate, but who says the two worlds can't collide? Although, this time I couldn't help but gravitate towards one of her few recipes that are a bit less healthy.  I can't help it.  Sorry, scones and I are just a match made in heaven! Not that I won't ever try her healthier dishes.  I mean, come on!  Doesn't Cantaloupe Wrapped in Prosciutto sound heavenly?  What about Sweet Potato Oatmeal?  That just has major YUM written all over it!

Secret Recipe Club is the genius idea of Amanda Formaro.  SRC has grown so large that there are now four groups.  Each week one group has a reveal day to which each member, of that group, can announce to the world which blog they have been secretly given to follow and create a recipe from.  There are some amazing blogs out there!  Be sure to check out the links at the bottom and see what everyone else has been cooking up!
Chocolate Toffee Cream Scones
(adapted from Katrina: recipe from Paige Vandegrift)
Ingredients
1 cup all purpose flour
1 1/2 teaspoons baking powder
1/8- 1/4 teaspoon salt (I used kosher salt)
1/8 cup granulated sugar
1/2 cup heavy cream (plus a little more for brushing on the tops)
Few drops of pure vanilla extract
1/4 cup toffee Bits (Hershey's Heath)
1/4 cup mini chocolate chips ( Nestle Toll-house Semi Sweet)

Combine the flour, baking powder, salt and sugar in a bowl. Whisk to blend well. Add the heavy cream (no cream? See my tip at the end!) and vanilla. Stir into dry ingredients with a rubber spatula while pouring the cream, continuing to stir until a soft, sticky dough is formed. Turn dough out onto a lightly floured surface and knead briefly (8-10 times). Pat the dough into a circle 1/2" to 3/4" thick. Cut the circles into 8 wedges and place the wedges an inch or so apart on a parchment-lined baking sheet.
Bake at 425°F until golden brown, about 13 minutes. Remove from oven, cool for a few minutes and then transfer to wire rack and cool... or do like we did and eat them fresh from the oven!

*Tip:  If you do not have any heavy cream on hand, substitute with 3 tablespoons melted butter mixed with 6 tablespoons milk.


The Daring Cooks: Cooking with Tea


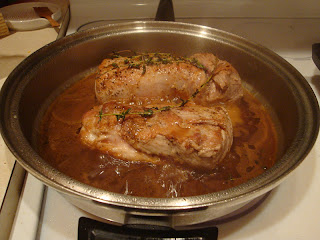
This month, for the Daring Cooks Challenge, we are encouraged to experiment with savory dishes using tea.  I've had desserts that used tea - heck, I even made chai tea cupcakes, but never before in a main dish.  This pork dish was amazing!  So very moist and tender with just the subtle taste of peach.  I'm definitely going to try incorporating tea into more dishes!

Blog-checking lines: Sarah from Simply Cooked was our November Daring Cooks’ hostess and she challenged us to create something truly unique in both taste and technique! We learned how to cook using tea with recipes from Tea Cookbook by Tonia George and The New Tea Book by Sara Perry.
Peach tea pork tenderloin
4 Stash Peach tea bags 
Salt & Pepper 
1/3 cup brown sugar 
1/2 cup water
 1 tbsp Dijon Mustard 
1 pork tenderloin, about 2lbs
1/2 cup chicken stock
 1 tbsp olive oil 
4 sprigs fresh thyme

 Directions:
Place 4 Peach tea bags in a tea cup and pour in 1/2 cup of boiling water. Let steep for 4 minutes. Remove tea bags. In a sauce pan combine brown sugar and tea concentrate. Mix well. Add the Dijon mustard, mix and bring the sauce to a boil. Whisk in the stock and let simmer for 1 minute. Set aside.

Salt and pepper the tenderloin. Heat the oil in the skillet on medium-high heat and sear the pork on each side. Add the peach sauce and the sprigs of thyme. Reduce the heat and cover. Cook over low heat until the pork is cooked through, approximately 20-30 minutes. Pork should register at least 150 degrees on a meat thermometer. Remove the pork from the pan, cover and let sit for 5-10 minutes. Keep sauce warm over low heat.

Pour any pork drippings back into the sauce and slice the pork. Serve peach sauce over pork.


Wednesday, November 9, 2011

Have the Cake Challenge: Hawaiian Bread


The Have the Cake Challenge for this month was bread.  Making bread was not going to be a challenge since I've made plenty over the years.  For me, the challenge was going to be finding a recipe I've not made before.  One of hubby's favorite breads is Kings Hawaiian bread and there are several recipes out there for it.  I chose one from allrecipes.com. The only change I made was baking it in two 9-inch round baking pans instead of three.  I had to bake it for an additional five minutes, but other than that it was incredibly easy to make and quite yummy.  I didn't have any pineapple juice so I opened up can of crushed pineapple and drained off the liquid.
Have the Cake Challenge: Hawaiian Bread
Ingredients
2 (.25 ounce) envelopes active dry yeast
1/2 cup warm water (110 degrees F/45 degrees C)
3 eggs
1 cup pineapple juice
1/2 cup water
3/4 cup white sugar
1/2 teaspoon ground ginger
1 teaspoon vanilla extract
1/2 cup butter, melted
6 cups all-purpose flour


Directions
In a small bowl, dissolve yeast in 1/2 cup warm water. Let stand until creamy, about 10 minutes.
In a large bowl, beat together the yeast mixture, eggs, pineapple juice, 1/2 cup water, sugar, ginger, vanilla, and melted butter. Gradually stir in flour until a stiff batter is formed. Cover with a damp cloth and let rise in a warm place for 1 hour.
Deflate the dough and turn it out onto a well floured surface. Divide the dough into three equal pieces and form into round loaves. Place the loaves into three lightly greased round cake pans. Cover the loaves with a damp cloth and let rise until doubled in volume, about 40 minutes. Meanwhile, preheat oven to 350 degrees F (175 degrees C).
Bake in preheated oven for 25 to 30 minutes, or until bottom of a loaf sounds hollow when tapped.

Pan Roasted Chicken


I've tried many variations of roasted chicken and this one is my favorite.  The cooking method is from a recipe I found at The Steamy Kitchen. If I didn't have such a finicky family, I would make it using their entire recipe (Roast split chicken with lemony artichoke sauce).Unfortunately, my husband and one son are picky... hubby is getting better though.
  I love that it was partially cooked in my cast iron skillet and went from stove top to oven.  The chicken was moist on the inside and crisp on the outside; who could ask for more? I even used the pan drippings and made a gravy for the mashed potatoes. In the pictures you can see toothpicks. When I butterflied the chicken the skin separated from the meat.  I just used the toothpicks to keep it attached.

Pan Roasted Chicken
adapted from Joanne Weir and The steamy kitchen
Ingredients
1- 3.5 pound chicken, butterflied with backbone removed
2 tablespoons canola oil
kosher salt
fresh ground black pepper

Directions
Preheat oven to 475 degrees F.  Rinse and completely pat dry your chicken.  On your stove top, heat a large oven safe frying pan on high heat.  Add oil and when it becomes very hot- gently place the bird skin side down in the pan.  
Season the top of the bird with salt and pepper.  Immediately place the entire pan in oven for 10 minutes.
Carefully remove hot pan from the oven, flip the bird over.  Generously season the skin side with salt and pepper.  Return pan to oven and roast another 25-30 minute.  Remove from oven, place chicken on a plate and tent with aluminum foil to keep warm. 

Monday, November 7, 2011

Crazy Cooking Challenge: Roasted Smashed Potatoes


This month's crazy cooking challenge was "Mashed Potatoes."  In case you are wondering, the crazy cooking challenge is the brainchild of Tina's from moms crazy cooking. Each month you are given a theme (last month was chocolate chip cookies) and you are to be inspired from another persons blog.  Genius!  I love being able to support another fellow blogger!

So, mashed potatoes is the theme for November and there are tons of different recipes out there!  Even my meat and potatoes loving husband enjoyed this challenge! The first recipe I tried was for a twice baked potato that used a package of Hidden Valley Ranch Dressing.  Oh yeah! It was definitely a keeper recipe and one I will share with you all in the future.  But I was looking for something a bit more different to put up for this challenge and was torn between trying Deep Fried Mashed Potato Balls and one called Roasted Smashed Potatoes.  Laziness won out in the end and I nixed the deep frying for the time being.  Roasted Smashed Potatoes was a bit time consuming, but really quite easy. Be sure to check out Chad's  blog, there is a plethora of information on it.   This was an interesting challenge. It will be nice to have a few new recipes to switch up side dishes from time to time. The idea behind this recipe is to have a crispy exterior and a creamy interior.... crazy as that sounds, it worked!  Super duper yummy!

Roasted Smashed Potatoes

2½ pounds baby reds or small Yukon gold potatoes (1½-2 inch in diameter)
3/4 cups water
3-4 tablespoons olive oil
fresh rosemary, thyme or sage for garnish
salt & pepper to taste
freshly grated Parmesan cheese

Directions

Move the oven rack to the top and bottom positions and preheat the oven to 500°. Place the potatoes on a baking tray and add the water.The potatoes should be fairly small, but if need be you may cut potatoes in half.  Cover pan  tightly with foil so that the potatoes will steam. Place the potatoes on the bottom rack in the oven and cook for about 25 minutes.

Take them out of the oven, remove the foil, and let the potatoes cool down for a few minutes.Drain off water.  Once cooled, drizzle potatoes with olive oil and roll them so that potatoes are evenly coated.
Space them evenly across the tray. Place another baking tray on top of the potatoes and smash them down until they’re only about ½ inch thick. Season them to your own taste; Add more olive oil and a generous amount of salt and pepper so that all the seasonings run into all of the cracks and depressions. I used some rosemary but it is really to your own preference what seasonings you would like to use.  I think garlic would also work really well with this!

Place the tray back in the oven and cook for about 15 minutes on the top rack. Switch to bottom rack and cook an additional 25 minutes . The bottom of the potatoes should be crisp. If desired, use the broiler on top rack to crisp up the tops more.  Remove from oven and sprinkle tops with freshly grated Parmesan cheese.

Wednesday, November 2, 2011

Taco Soup


As the temperatures begin to drop, I begin to rely more on the hearty dishes.  I love soup and am always happy when I can find a recipe that pleases most family members(In this family, someone is always bound to dislike something!).  I put together a taco soup recipe that is a combination of a what I liked in a couple different recipes.  I make our own salsa so I used that in place of the picante sauce one of the recipes called for.  My husband, much as I love him to death, dislikes "vegetables" in his foods so I end up putting a lot of vegetables in the blender for him.  Its a happy medium.... I get my flavors and he gets his "chunky vegetable free" food. 
I doubled this recipe and used one can of white beans and one can of red kidney beans.  I only used one can of diced tomatoes and used roasted petite diced tomatoes.  In the past I have used the addition of the pepper, chili powder and cumin but my salsa is so spicy I didn't feel it needed the addition.
I served this up with some fresh cornbread, yummy! 

Taco Soup
adapted from taste of home
1 pound lean ground beef or ground turkey
2 teaspoons olive oil,   I omit and  just use a bit of cooking spray in my pan
1 medium onion, chopped
2 garlic cloves, minced
3 cups chicken, vegetable or beef broth   I prefer chicken broth
1 can (15 ounces) black beans, white beans or kidney beans,rinsed and drained
1 can (14-1/2 ounces) diced tomatoes
1-1/2 cups picante sauce or salsa
1 cup uncooked  pasta
1 small green pepper, chopped   I omitted this because my salsa was heavily seasoned
2 teaspoons chili powder        I omitted this because my salsa was heavily seasoned
1 teaspoon ground cumin        I omitted this because my salsa was heavily seasoned
sour cream, optional
shredded cheddar cheese, optional

Directions:
In a medium  skillet, brown and drain ground beef; set aside. In a large saucepan, saute onion and garlic  until tender. Add the broth, browned beef,  beans, tomatoes, picante sauce, pasta, green pepper and seasonings. Bring to a boil, stirring frequently. Reduce heat; cover and simmer for 10-12 minutes or until pasta is tender, stirring occasionally. Serve with cheese and sour cream. Yield: 6 servings.