Monday, September 27, 2010

The Daring Baker: September challenge Get Creative

Print Friendly and PDF
The September 2010 Daring Bakers’ challenge was hosted by Mandy of “What the Fruitcake?!” Mandy challenged everyone to make Decorated Sugar Cookies based on recipes from Peggy Porschen and The Joy of Baking.

Part of this challenge was to decorate the cookies as you seemed fitting for the month of September.  It was awesome seeing everyones approach to the particular theme.  Many of the Daring Bakers are from all over the world so while we Americans are in the autumn season, it has just turned spring for others! Some other bakers approached the theme by seeing September as a birthday, anniversary or even thank you month.  As you can see, for me its all about the leaves turning colors, apple picking and snuggling up with my husband while drinking hot chocolate and munching on candy corn.

I tried a new recipe for the royal icing and, sorry Martha, was not impressed.  The icing lacked the shine I get with my other recipe.  I'm not even going to bother sharing Martha Stewart's recipe but it is available on her website if you would like to have it.

We were able to use whatever royal icing we wanted but had to make the given recipe for the sugar cookies.  While time consuming, the cookies were incredibly easy to roll out and tasted great.

Basic Sugar Cookies:
Makes Approximately 36x 10cm / 4" Cookies

200g / 7oz / ½ cup + 6 Tbsp Unsalted Butter, at room temperature
400g / 14oz / 3 cups + 3 Tbsp All Purpose / Plain Flour
200g / 7oz / 1 cup Caster Sugar / Superfine Sugar
1 Large Egg, lightly beaten
5ml / 1 tsp Vanilla Extract / Or seeds from 1 vanilla bean

Directions

• Cream together the butter, sugar and any flavourings you’re using. Beat until just becoming
creamy in texture.
• Tip: Don’t over mix otherwise you’ll incorporate too much air and the cookies will spread during
baking, losing their shape.
• Beat in the egg until well combined, make sure to scrape down the sides of the bowl.
Add the sifted flour and mix on low until a non sticky dough forms.
• Tip: I don’t have a stand mixer so I find it easier to switch to dough hooks at this stage to avoid
flour flying everywhere.
• Knead into a ball and divide into 2 or 3 pieces.
• Roll out each portion between parchment paper to a thickness of about 5mm/1/5 inch (0.2 inch)
• Refrigerate for a minimum of 30mins.
• Tip: Recipes commonly just wrap the whole ball of dough in clingwrap and then refrigerate it for an
hour or overnight, but by rolling the dough between parchment, this shortens the chilling time and
then it’s also been rolled out while still soft making it easier and quicker.
• Once chilled, peel off parchment and place dough on a lightly floured surface.
• Cut out shapes with cookie cutters or a sharp knife.
• Arrange shapes on parchment lined baking sheets and refrigerate for another 30mins to an hour.
• Tip: It’s very important you chill them again otherwise they’ll spread while baking.
• Re-roll scraps and follow the above process until all scraps are used up.
• Preheat oven to 180°C (160°C Fan Assisted) / 350°F / Gas Mark 4.
• Bake until golden around the edges, about 8-15mins depending on the size of the cookies.
• Tip: Bake same sized cookies together otherwise mixing smaller with larger cookies could result in
some cookies being baked before others are done.
• Tip: Rotate baking sheets half way through baking if your oven bakes unevenly.
• Leave to cool on cooling racks.
• Once completely cooled, decorate as desired.
• Tip: If wrapped in tinfoil/cling wrap or kept in airtight containers in a cool place, un-decorated
cookies can last up to a month.

Sunday, September 26, 2010

The Cookie Carnival: Apple Butter Cookies

Print Friendly and PDF
You can tell fall is in the air... and in my kitchen. Tis the season for canning, jamming and baking with pumpkin and apple!  Seems to be fitting that one of the cookie selections for this month's Cookie Carnival would be apple butter cookies.  As luck would have it, I even had a jar of home made apple butter left over from last fall!

I promised to always be honest with you - if a dessert failed or bombed then so be it.  I would have to say that this recipe was not one I am going to repeat.  These weren't a cookie so much as they were a cake.  While very moist, it just wasn't pallet pleasing to me.  If I'm going to eat a cookie I want some "oomph" to it, so to speak.  Frankly, I thought it was a waste of some darn good home made apple butter. 

Apple Butter Cookies
Courtesy of Anna Olson

1/2 cup unsalted butter, at room temperature
3/4 cup sugar
1/4 cup light brown sugar, packed
1 tablespoon fancy molasses
3/4 cup sour cream
½ + ½ cup apple butter
2 large egg yolks
1 large egg
2 cups pastry flour
1/2 cup whole wheat flour
1 teaspoon cinnamon
1/4 teaspoon nutmeg
3/4 teaspoon baking powder
3/4 teaspoon baking soda
1/2 teaspoon fine salt

Directions

Preheat oven to 325 degrees F. and line a baking tray with parchment.
Beat butter, sugar and brown sugar together until smooth. Stir in molasses, sour cream and ½ cup apple butter. Stir in yolks and eggs.
In a separate bowl, sift dry ingredients and gently stir into butter mixture. Spoon or pipe 2/3 of batter by tablespoonfuls onto prepared baking tray, leaving 1 ½-inches between them. Spoon a teaspoonful of remaining apple butter into centre of each cookie and top each with remaining batter. Bake for 15 to 18 minutes, until cookies lift easily from tray.
add the applesauce
and top with more dough


Saturday, September 25, 2010

Have the Cake Challenge: Pretzels

Print Friendly and PDF


Away from the sweet but still soft and delicious; that's what this month's challenge is for Have the Cake.  I love a good pretzel and I could eat a dozen Aunt Annie's pretzels.  Well, I've never eaten a dozen pretzels but I don't think it would be too hard if I put my mind to it! 
I found this recipe for butter pretzels on the allrecipes web site. They weren't difficult to make and while it is a bit time consuming to make your own pretzels, it is certainly worth it.  The only downfall to this recipe was that it only made a dozen.  However, homemade pretzels do not keep well so maybe only making a fresh dozen is a good thing.  Find the original recipe here

Buttery Soft Pretzels
adapted by vivian thiele

4 teaspoons active dry yeast

1 teaspoon white sugar
1 1/4 cups warm water (110 degrees F/45 degrees C)
4 cups all-purpose flour  (add up to five cups if needed)
1/2 cup white sugar
1 1/2 teaspoons salt
1 tablespoon melted butter
coarse kosher salt  for topping
1/2 cup baking soda
4 cups hot water
2 tablespoons melted butter (to brush on top of pretzels when removed from oven)

Directions
In a small bowl, dissolve yeast and 1 teaspoon sugar in warm water. Let stand until foamy, about 10 minutes.

In a large bowl, mix together flour, 1/2 cup sugar, and salt. Make a well in the center; add the melted butter and yeast mixture. Mix and form into a dough. If the mixture is dry, add one or two tablespoons of water. Knead the dough until smooth, about 7 to 8 minutes. Lightly oil a large bowl, place the dough in the bowl and turn to coat with oil. Cover with plastic wrap and let rise in a warm place until doubled in size, about 1 hour.

Preheat oven to 450 degrees F (230 degrees C). In a large bowl, dissolve baking soda in hot water.


When risen, turn dough out onto a lightly floured surface and divide into 12 equal pieces. Roll each piece into a rope and twist into a pretzel shape. Once all of the dough is all shaped, dip each pretzel into the baking soda solution and place on a greased baking sheet. Sprinkle with kosher salt.

twist them up

dip them in the soda bath
Bake in preheated oven for 8 minutes, until browned.  Remove from oven and brush with melted butter.


Monday, September 20, 2010

Linguine with Cilantro and Pepita Pesto

Print Friendly and PDF
This Month’s Every Day with Rachael Ray magazine showed a link for her new cookbook challenge.  Curiosity got the best of me (besides, like I could ever pass up a challenge!) so I looked up the link (here).   
The cookbook “High Flavor, Low Labor” by J.M. Hirsch, quickly catches my eye.  Hey, I’m all for less work!  Rachael’s recipe pick was for Linguine with Cilantro and Pepita Pesto.  What is a pepita???  Unshelled pumpkin seeds!  While the original recipe called for a manchego cheese, I sure couldn’t find it in any of our stores. A quick web search gave me a few alternative cheeses depending on if they were asking for aged manchego or not.  Since I was making a pesto I went with the assumption that aged would be best as I don’t like semi soft cheese like Monterey Jack or mozzarella in my pesto.  The cheese of my choice was a pecorino Romano.
food 106
Linguine with Cilantro and Pepita  Pesto    
12 ounces linguine
4 ounces manchego cheese, cut into small chunks, plus extra for garnish (I used Romano) 1⁄2 cup roasted pepitas (shelled pumpkin seeds) I could only find raw pepitas so had to toast them first
1 cup packed fresh cilantro, thick stems removed  I do not like that much cilantro so adjusted to my own taste
1⁄2 tablespoon jarred jalapeño pepper slices
2 cloves garlic
3 tablespoons extra-virgin olive oil
1 tablespoon lime juice
Salt and ground black pepper, to taste
Directions:
Bring a large pot of salted water to a boil. Cook the pasta according to package directions. Reserve 1⁄4 cup of the cooking water, then drain the pasta and return it to the pot.
Meanwhile, in a food processor, combine the cheese and pepitas. Pulse until finely ground. Add the cilantro, jalapeño peppers, garlic, oil, and lime juice. Process until the mixture forms fine, moist crumbs. Taste, then season with salt and pepper.
Add the pesto and the reserved cooking water to the pasta and toss well to coat and heat the pesto. Serve topped with additional cheese.
food 101  food 105

Thursday, September 16, 2010

Owl Cupcakes

"Whoooo" are you?  That was our theme for the first day of our Sunday school class.  It was move up Sunday and I had some new kids join our class.  I always like to make our first day special since it is a new routine the kids will be learning.  It can be a bit overwhelming for the little ones at first since they are no longer preschoolers but kindergartners and first graders.  They learned a few new songs, played some getting to know you games and then we taught the lesson on "Who they are in Christ."  Wrapping up this fun filled time I gave them some owl cupcakes I made( Hello, Cupcake!).  They were a big hit and the kids enjoyed their sugar high (sorry parents!!).  Thankfully our Sunday school was followed up with a big church picnic and the children were able to play outdoors.

Wednesday, September 15, 2010

MSC September Challenge: Cookies and Cream

Print Friendly and PDF
Nina from Nina's Cupcakes chose Cookies and Cream Cupcakes for this month's flavor of Martha Stewart's Cupcake Challenge.

This recipe makes thirty of the most sinful tasting desserts you will ever eat!  It isn't a true "cupcake" as it. is a cheesecake in a cupcake liner. Who cares???!!  It had a cookie and cheesecake...need I say more???  After sharing a few of these delights with my family, painful as that was, I made my husband take the rest to work.  These were good to keep around the house.

Martha Stewart's Cookies and Cream
From the book: Martha Stewart's Cupcakes: 175 Inspired Ideas for Everyone's Favorite Treat

42 cream-filled sandwich cookies, such as Oreos, 30 left whole, and 12 coarsely chopped
2 pounds cream cheese, room temperature
1 cup sugar
1 tsp vanilla extract
4 large eggs, room temperature, lightly beaten
1 cup sour cream
Pinch of salt


Directions:

1. Preheat oven to 275 degrees. Line standard muffin tins with paper liners. Place 1 whole cookie in the bottom of each lined cup.

2. With an electric mixer on medium high speed, beat cream cheese until smooth, scraping down sides of bowl as needed. Gradually add sugar, and beat until combined. Beat in vanilla.

3. Drizzle in eggs, a bit at a time, beating to combine and scraping down the sides of the bowl as needed. Beat in sour cream and salt. Stir in chopped cookies by hand.

4. Divide batter evenly among cookie-lined cups, filling each almost to the top. Bake, rotating pan halfway through, until filling is set, about 22 minutes. Transfer to wire racks to cool completely. Refrigerate at least 4 hours (or up to overnight). Remove from tins just before serving.
three for me!!
one for you :-)

Daring Kitchen September Challenge: Food Preservation Bruschetta

Print Friendly and PDF

The September 2010 Daring Cooks’ challenge was hosted by John of Eat4Fun. John chose to challenge The Daring Cooks to learn about food preservation, mainly in the form of canning and freezing. He challenged everyone to make a recipe and preserve it. John’s source for food preservation information was from The National Center for Home Food Preservation.

I'm an experienced canner, although I've only recently began to try my hand at processing condiments.  Of the two choices we had, I opted to try my hand at making the bruschetta (the other choice was apple butter which I make quite often.).

This recipe was a true success! My mom and I ate an entire jar for dinner one night and it was amazing! Served over a nice crisp baguette, slightly toasted, with an additional topping of basil and you had a bite full of heaven!

The recipe for Bruschetta in a Jar  came from the Bernardin Canning website.

Bruschetta in a Jar

Plum/Roma Tomatoes * 3 1/2 lbs 1.6 Kg 20 Medium Wash, seed and chop
Fresh Garlic 5 Cloves Minced
Dry White Wine 1 Cup 250 ml
White Wine Vinegar 1 Cup 250 ml
Balsamic Vinegar 2 Tbl 30 ml
Sugar, Granulated 2 Tbl 30 ml
Dried Basil 2 Tbl 30 ml
Dried Oregano 2 Tbl 30 ml

* Note: Although other tomato varieties may be used, firm plum tomatoes yield the best results. If using round garden-variety tomatoes, seed tomatoes and drain in colander for 30 minutes then chop.

Directions:
Place 7 clean half-pint (250 ml) mason jars on a rack in a boiling water canner; cover jars with water and heat to a simmer (180°F/82°C). Set screw bands aside. Heat lids in hot water, not boiling (180°F/82°C). Keep jars and sealing discs hot until ready to use.


1. Wash, seed and chop tomatoes into 1/2 inch (1cm) pieces; measure 9 cups (2250 ml), set aside.

    
2. Combine garlic, white wine, wine vinegar, balsamic vinegar, water, sugar, basil and oregano in a deep stainless steel saucepan. Bring to a full boil; reduce heat. Stirring occasionally, boil gently, covered, 5 minutes. Remove from heat.


 3. Pack tomatoes into a hot jar to within 3/4 inch (2 cm) of top rim. Add hot liquid to cover tomatoes to within 1/2 inch (1 cm) of top rim (headspace). Using nonmetallic utensil, remove air bubbles and adjust headspace, if required, by adding more tomatoes and hot liquid. Wipe jar rim removing any food residue. Centre hot sealing disc on clean jar rim. Screw band down until resistance is met, then increase to fingertip tight. Return filled jar to rack in canner. Repeat for remaining tomatoes and hot liquid.


 4. When canner is filled, ensure that all jars are covered by at least one inch (2.5 cm) of water. Cover canner and bring water to full rolling boil before starting to count processing time. At altitudes up to 1000 ft (305 m), process –boil filled jars – 20 minutes.

     Processing Time:
    20 minutes for altitude of 0 ft (0 m) to 1,000 ft (305 m)
    25 minutes for altitude of 1,001 ft (305.1 m) to 3,000 ft (915 m)
    30 minutes for altitude of 3,001 ft (916 m) to 6,000 ft (1,830 m)
    35 minutes altitudes above 6,000 ft (1,831 m) to 8,000 ft (2,440 m)

6. When processing time is complete, remove canner lid, wait 5 minutes, then remove jars without tilting and place them upright on a protected work surface. Cool upright, undisturbed 24 hours; DO NOT RETIGHTEN screw bands.

7.  After cooling check jar seals. Sealed discs curve downward and do not move when pressed. Remove screw bands; wipe and dry bands and jars. Store screw bands separately or replace loosely on jars, as desired. Label and store jars in a cool, dark place. For best quality, use home canned foods within one year.

Serving Suggestions:
With boiling water canning, very little oil is used since the oils can weaken the seals on the jar. You can top your Bruschetta, olive oil and fresh herbs can be added before serving on top of toasted bread or as a condiment to a dish.  This also tastes delicious over fresh pasta or fish.

Wednesday, September 1, 2010

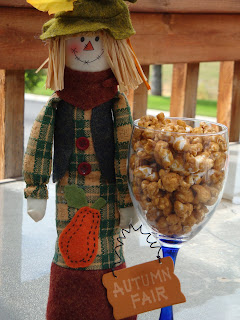
Fall is in the air and Caramel Corn season is here!

Print Friendly and PDF


For some people the end of summer means back to school, the start of football season, harvesting, etc.  In our family it means its time to start making caramel corn.  My husband and son can eat it by the gallons.... I'm serious, they do!!

Don't you wish you could reach right in and grab some??
I've had this book on how to make candy for over twenty years now and it has the best recipe for caramel corn. I've made it using real butter as well as margarine, dark brown sugar or light brown sugar - whatever your preferences are, go with it. 
Hints:
I've tripled this recipe with success.  If you attempt to make more it does become more of a challenge to stir. 
Be sure to lightly coat your pots with cooking spray for easier cleanup!  I use my big stock pot or canning pot to mix in.
 Its best to use air popped or popcorn popped on stove.  The microwave popcorn's I have found to have too tough a texture.

Delicious Caramel Corn
adapted by Vivian from the
"How To Make Candy Book"

6 quarts popped corn
2 cups brown sugar
1 cup margarine
1/2 cup light corn syrup
Dash of salt
1/2 teaspoon baking soda

Preheat oven to 250 degrees F.  Place popcorn in lightly sprayed pot (big enough too hold the amount you are making!).
Combine the brown sugar, margarine, corn syrup and salt in a heavy 2-quart saucepan.  Bring to a boil over medium heat, stirring frequently.  Continue to cook at a boil for five minutes.
Remove from heat and add baking soda.  Be sure to stir quickly as this will begin to foam up and may over flow!
Pour syrup slowly over popcorn and gently stir to be sure all popped corn is covered.
Bake for 10 minutes, remove from oven and gently stir.  Rotate pans and repeat process after another 10minutes  Continue baking using this method for a full 40 minutes maximum (only rotate and stir a total of four times with a ten minute baking period between each rotation)
Remove from oven and let cool.  When cooled, gently break apart and put into an air tight container.
Sweet Indulgence