Showing posts with label monthly challenge. Show all posts

Wednesday, February 22, 2012

Creamy Roasted Garlic Soup

I have been making an attempt to keep our Monday's meat-less.. ish.  I think that since I use beef or chicken broth I can't exactly say it is meatless.  Anyway, I'm a huge soup fan and have been aching to try my hand at garlic soup.  It just sounds so intriguing! I love garlic. I love soup... to me its just a win win!
I found a recipe here  on the food network website.  I did want to shake it up a bit; I wanted to roast my garlic first.  The cheese adds just the right bite to it and takes this soup over the top!

Creamy Roasted Garlic Soup
adapted from the food network
Ingredients
1 tablespoon olive oil
1 cup onions, thinly sliced
2 heads of garlic, roasted
1 cup dry white wine
1 quart chicken stock
1 bay leaf
2 cups of French bread, 2-inch pieces
3/4 cup heavy cream
Salt and pepper
1/2 cup Gruyere cheese, grated

Directions
To roast the Garlic: cut head of garlic in half.  Lightly drizzle with olive oil and wrap in parchment paper or tinfoil.  Bake at 375 Degrees F. for about thirty minutes.

In a large soup pot add tablespoon of olive oil; add onion and cook over medium heat for 8 minutes.  Add roasted garlic to pot and continue cooking for another 4-5 minutes; the onion and garlic will begin to caramelize.
Deglaze the pot by adding the wine and continue to cook for 10 minutes. Add the stock and bay leaf; bring to a boil then reduce heat and simmer for thirty minutes.Remove from the heat and add the bread cubes. Allow the soup to sit without heat for 10 minutes. Remove the bay leaf. Using a hand held blender, puree until smooth. Add the cream and adjust the seasonings. Serve garnished  with the cheese.

Monday, February 20, 2012

Monthly Challenge: Macaroni and Cheese Soup


The Monthly Challenge for February was to make soup or stew.  I have to ask your forgiveness.  You see, this soup was so delicious that I completely forgot to take a picture!  Everyone in the family gave this a big hooray... doesn't happen that often when we all can agree on a keeper recipe!

Macaroni and Cheese Soup
adapted from Food Network Magazine

Kosher salt
1 cup dry elbow macaroni
1/2 medium onion, chopped fine
2 tablespoons butter
1 carrot, shredded
1 stalk celery, shredded
3/4 teaspoon dry mustard powder
1/8 teaspoon cayenne pepper (we like heat so I added more, but this is a good start!)
1/4 cup all-purpose flour
3 and 3/4 cups chicken stock
1 and 1/4 cups milk
1 cup sharp cheddar cheese, shredded
1/2 cup shredded Mexican cheese blend

Directions:

Fill a large sauce pan with water, add kosher salt and bring to a boil.  Add macaroni and cook according to
package directions.  Drain and set aside.

In a saucepan, add 2 tablespoons butter and melt; add the vegetables and cook over medium high heat until softened, about 4 minutes.  Add the flour; cook stirring constantly for another 2 minutes (you want the flour to brown slightly to eliminate the raw taste of flour).  Add the mustard powder ad cayenne pepper.  Gradually stir in the stock and bring to a boil; stir until thickened, about 6 minutes.
Remove from the heat and add the milk, cheeses and macaroni.  Stir until the cheese melt; season with salt and pepper to taste.

Serves 4

Thursday, August 25, 2011

curry revisited


     Last month's Daring kitchen challenge was to do a traditional Southern Indian dish.  No problem, right?  Wrong! I found that the meat dishes all involved curry leaves... not to be confused with curry powder. It took a trip to out of state to find this elusive ingredient! Ok, so we didn't go out of state to just get curry leaves.  We went on a mini vacation and for us that involves either hitting an amusement park or visiting all the ethnic markets we can find.  We couldn't find any curry leaves in Portland but our lovely Indian hotel manager advised us to go to his favorite market in Vancouver, Washington. There I was not only able to find curry leaves but I gathered up several other interesting items off the shelves as well. Unfortunately, these leaves needed to be kept frozen.  I bought a small package and hoped and prayed that using our tiny cooler would keep them fresh enough.
     We later drove on up to Seattle to visit our son.  One of the best things about Seattle is their Pike Street Market.  I love browsing through all the fresh vendors! There are literally hundreds of shops throughout Pike street and right across the street we found an Indian market.  They carried dried curry leaves so I bought a package in case my frozen ones did not survive.  There are tons of ethnic markets in Seattle we just didn't have enough time to visit all of them.  Looks like we will have to do a return visit!
    Luckily, now that I have my ingredients, the August Monthly Challenge was to make an ethnic dish.  I wish to revisit the curry challenge and make a curry dish using the curry leaves. Totally worth the effort of seeking out the ingredients!  Yes, all of these ingredient can be bought online, but really, is there any fun in that?

Marsala Beef With Ginger and Curry Leaf
adapted recipe from allrecipes.com
Ingredients:
3 bay leaves
1 (1 inch) piece cinnamon stick 
5 cardamom pods
2 whole cloves  (recipe called for 4 but I am not a huge clove fan)
2 teaspoons fennel seeds
10 whole black peppercorns
2 pounds cross rib roast, cubed
3 cups chopped onion, divided
2 pasilla peppers,chopped
1 (1 1/2 inch) piece fresh ginger root, grated
6 cloves garlic,chopped fine
1/2 teaspoon ground turmeric
1 teaspoon salt
2 tablespoons oil
1 teaspoon whole mustard seeds
4 fresh curry leaves
1/2 cup coconut butter
1/2 lemon, juiced
1 teaspoon ground black pepper

DIRECTIONS:
1. To make the masala powder: Grind the bay leaves, cinnamon, cardamom, cloves, fennel seeds and peppercorns in a spice grinder until mixture is a fine powder. I used a coffee grinder that I set aside for grinding spices only.
2. Place the beef cubes, masala powder, 2 cups chopped onion, green chiles, grated fresh ginger, garlic and turmeric in a large, heavy pot. Add water to cover (about 1 cup) and bring to a boil. Reduce heat and simmer for 30 minutes until beef is cooked through. Add salt. Stir and continue to simmer about 10 minutes or until mixture is almost dry, but do not allow it to burn (add a bit more water, if necessary). Set aside.
3.  Over a large skillet over medium-high heat, add oil and mustard seeds; cook until they begin to pop. Immediately add remaining 1 cup chopped onion and stir over medium heat until onions soften and begin to brown, about 10 to 12 minutes. Add curry leaves and cook until brown, about 3 minutes. Add coconut butter ( used the butter found at the top of an unshaken can of coconut milk)

4.Stir in the beef mixture and black pepper,. Cook until heated through. Top with lemon juice just before serving.

Saturday, June 25, 2011

Monthly Challenge Blogaversary: Black Bean Enchiladas


The June Monthly Challenge was to recreate a recipe from the blog.  I chose the Black Bean Enchiladas that had originally been posted in May of 2009. 

The changes I made was to use the entire recipe for the black bean mixture, made more own corn tortillas and enchilada sauce.
The recipe is from the Food Network Magazine  and can be found here.  The used the black bean mixture for two recipes; once for burgers and then using the remaining mixture for the enchiladas.  I used all of the recipe for the enchiladas... I like ours filled! The bean recipe by itself was rather bland and I would definitely have to spice it up if I was to use it in burgers.  However, the enchilada sauce I used worked well with it and gave it lots of flavor.

Black Bean Burgers:

  • 1/2 medium yellow onion, roughly chopped
  • 1 tablespoon chopped garlic
  • 2 (15-ounce) cans black beans, rinsed and drained, divided
  • 2 tablespoons freshly chopped cilantro leaves
  • 2 teaspoons freshly chopped parsley leaves
  • 1 egg
  • 1/2 teaspoon red pepper flakes
  • 1/2 cup bread crumbs
    • 8 corn tortillas
    • 1 cup leftover black bean burger mixture
    • 1 can enchilada sauce (or try my recipe which follows!)
    • 1/2 cup shredded Cheddar
    • Salt and fresh ground black pepper
  • In a food processor, pulse onion and garlic until finely chopped. Add 1 can black beans, cilantro, parsley, egg, and red pepper flakes and pulse to combine.
    Transfer mixture to a large mixing bowl, add the remaining can of black beans and the bread crumbs. Season with salt and pepper, to taste, and mix until well combined.
    Preheat oven to 350 degrees F.
    Pour half the of the enchilada sauce into the bottom of a baking dish.
    Warm tortillas by wrapping in a damp paper towel and heating in microwave for 45 seconds or until soft and pliable.
    Place 2 tablespoons of black bean burger mixture onto the bottom third of a tortilla. Roll the tortilla up and place seam side down into the baking dish. Repeat with remaining black bean burger mixture and tortillas. Pour the remaining enchilada sauce over the filled tortillas. Top with the Cheddar and bake in the preheated oven for 15 to 20 minutes or until the cheese is browned and bubbly.
  • this is my recipe for Enchilada Sauce.... I have had it for years and don't recall where the recipe came from

1 tablespoon vegetable oil
1 onion, diced or minced whichever you prefer
3 tablespoons chili powder
3 cloves garlic, minced
2 teaspoons cumin
2 teaspoons sugar
15 ounce can tomato sauce or 2 (8-ounce) cans if that's what you have on hand
1/2 cup water
salt and pepper to taste
     Heat the oil and and cook the onion until it is soft.  Add the chili powder, garlic, cumin and sugar,tomato sauce and water.  Simmer and cook until it is thickened. 

Tuesday, April 19, 2011

Monthly Challenge for April: Sandwiches - Fajitas!!!!!


April's Monthly challenge was sandwiches.  I love bread (my thighs will prove it to you!) so I was very excited about this challenge. I love mixing up stuff for sandwiches to make a quick meal.  I had some round steak that had been in my freezer for a bit too long and I knew it would be tough. One way to rescue tough meats is to put them in a marinade to help break up some of those connective tissues.  I Had some chicken breasts as well so added them into the mixture as well.  Hubby is a veggie-phobe (I'm working on him but he is still very picky) so I cooked up the peppers and onions on the side with just a bit of the marinade I had made.  Was a very yummy meal!  I served it up with some Spanish quinea (using the recipe from a previous challenge but kicking it up a notch).

For the Marinade I used:
Juice of two limes
2 tablespoons olive oil
4 crushed garlic cloves
1/2 teaspoon cayenne
1 teaspoon cumin
1/2 teaspoon coriander
1 teaspoon black pepper
1 teaspoon salt
about 2 teaspoons soy sauce
I have a jar of sliced jalapeño peppers in my fridge so I added a tablespoon of those into the marinade and about 1/4 cup of the liquid as well. 
Two tablespoons water
4 green onions

I sliced up the meat (thin), put it into a ziplock bag and added the marinade ingredients into it.  I gave the bag a good squishing then placed the bag into a bowl (in case it leaked) and let it set for about three hours.  When it came time to cook it I just heated up my cast iron skillet and got it really hot.  I took the meat out of the marinade (other wise the meat would have steam cooked with all the marinade liquid) and cooked the meat through.  Really quite yummy!

Monday, February 21, 2011

Homemade Gnocchi Bake with Red Onions and Pancetta


This months Monthly Challenge was to make "red" foods for the month of February. Right off I swore I wouldn't do the obvious choices of red velvet cake or tomato based dishes..... But I was sooooooo wrong. When I did a Google search of "red foods" (seriously, look it up and you will see quite a listing!) and I came across this recipe for Gnocchi with Red Onions and Pancetta it just screamed out at me. Gnocchi has been on my list of things to make for ages now and hey, red onion count as red, right?? Ok, don't go getting all technical on me. I know that they are not really "red" but lets not get picky about things :-) 
Gnocchi
3 large baking potatoes (Idaho, about 1 3/4 pounds)
1 large egg
1 teaspoon salt
1/4 teaspoon fresh ground white pepper
1 pinch of freshly grated nutmeg
1/4 cup freshly grated Parmesan cheese
2 cups all purpose flour (as needed)

Directions:
Place the potatoes in a large pot with enough cold water to cover. Bring the water to a boil and cook, partially covered, until the potatoes are easily pierced with a skewer but the skins are not split, about 3
5 minutes.
Drain the potatoes and let them stand just until cool enough to handle. (The hotter the potatoes are when they are peeled and riced, the lighter the gnocchi will be.) Working quickly and protecting the hand that holds the potatoes with a folded kitchen towel or oven mitt, scrape the skin from the potato with a paring knife. Press the peeled potatoes through a potato ricer. Alternatively, the potatoes can be passed through a food mill fitted with the fine disc, but a ricer makes fluffier potatoes and therefore lighter gnocchi.
 Spread the riced potatoes into a thin, even layer on the work surface, without pressing them or compacting them. Let them cool completely.


In a small bowl, beat the egg, salt, pepper, and nutmeg together. Gather the cold potatoes into a mound and form a well in the center. Pour the egg mixture into the well. Knead the potato and egg mixtures together with both hands, gradually adding the grated cheese and enough of the flour, about 1 1/2 cups, to form a smooth but slightly sticky dough. It should take no longer than 3 minutes to work the flour into the potato mixture; remember, the longer the dough is kneaded, the more flour it will require and the heavier it will become. As you knead the dough, it will stick to your hands and to the work surface: Repeatedly rub this rough dough from your hands and scrape it with a knife or dough scraper from the work surface back into the dough as you knead.          

      Dust the dough, your hands, and the work surface lightly with some of the remaining flour. Cut the dough into six equal pieces and set off to one side of the work surface. Place one piece of dough in front of you and pat it into a rough oblong
Using both hands, in a smooth back-and-forth motion and exerting light downward pressure, roll the dough into a rope 1/2 inch thick, flouring the dough if necessary as you roll to keep it from sticking. (When you first begin making gnocchi, until your hands get the feel of the dough, you may find it easier to cut each piece of dough in half to roll it.). Slice the ropes into 1/2-inch-thick rounds. Sprinkle the rounds lightly with flour and roll each piece to prevent sticking. Repeat the whole process with the remaining pieces of dough. At this point the gnocchi must be cooked immediately or frozen.
To cook gnocchi:Bring six quarts of salted water to a vigorous boil in a large pot over high heat. Drop about half the gnocchi into the boiling water a few at a time, stirring gently, until tender, about 1 minute after they rise to the surface.
To freeze gnocchi:It is best to freeze gnocchi uncooked as soon as they are shaped. Arrange the gnocchi in a single layer on a baking pan and place the pan in a level position in the freezer. Freeze until solid, about 3 hours. Gather the frozen gnocchi into resealable freezer bags. Frozen gnocchi can be stored in the freezer for 4 to 6 weeks.
To cook frozen gnocchi:Frozen gnocchi must be cooked directly from the freezer in plenty of boiling water, or they will stick together. Bring 6 quarts salted water to a boil in each of two large pots. Shake any excess flour from the frozen gnocchi and split them between the two pots, stirring gently as you add them to the boiling water. It is important that the water return to a boil as soon as possible; cover the pots if necessary. Drain the gnocchi as described above and sauce and serve according to the specific recipe.
                                                         Gnocchi Bake with red onions and pancetta
adapted from here
1 tablespoon olive oil
4 ounces Pancetta, cubed
1 red onion, peeled and finely diced
2 cloves garlic, crushed
1 cup chopped tomato (I used one cup of canned diced tomato)
3 tablespoons sun dried tomato paste (sadly, this is unheard of in my area so I used regular tomato paste)
1 cup Mascarpone cheese
1 pound fresh gnocchi
8-10 fresh basil leaves, finely chopped
2 cups grated mozarella cheese (which I thought was way overkill so I used maybe 3/4 cup
1/3 cup white breadcrumbs (again, I thought this was a bit much so just used a couple tablespoons)

Directions:
Preheat the oven to 350°F / 180°C.
Heat the oil in a skillet and add the pancetta. Cook over a medium heat, stirring frequently, for 1 minute.
Add the red onion and garlic and cook, stirring, for a further 5 minutes, or until the pancetta is cooked and the onion softened.
Stir in the chopped tomatoes, sun-dried tomato paste, and mascarpone cheese. Simmer over a low heat for 5 minutes.
Meanwhile, cook the gnocchi for 1-2 minutes, until they rise to the surface. Do not overcook.
Drain the gnocchi thoroughly and place in a large ovenproof dish (My 9-inch square pyrex worked perfectly).
Add the chopped basil to the pancetta sauce mixture and stir. Pour the sauce over the gnocchi and toss gently to coat it.
Combine the grated cheese with the breadcrumbs and scatter over the gnocchi.
Cook in the preheated oven for 15-20 minutes, or until golden and bubbling.

Saturday, January 8, 2011

Bagels

Print Friendly and PDF
This month's have the cake challenge was to forgo the sweet route and bake up some bagels.  I've been sugared up enough with all the Christmas baking I did so this was something I could truly enjoy trying.
A look throughout the Internet gave me a multitude of bagel recipes.  There were long and tedious recipes and relatively quick and easy... guess which route I went?! Long and tedious have their rightful place in my life but I didn't think it was the right route to go for a simple bagel.  A look through one of my favorite sites, Allrecipes.com, and I chose one that had been favorably reviewed and used the boiling method. Don't ask me why... I'm not a bagel expert... but boiling seemed the best method in my thinking.  After all, didn't it turn out great when I made the pretzels?  The recipe I found was a fabulous base recipe.  I will be making bagels again and when I do I'll be adding other things like flax seed, whole wheat, dried fruit, cheese... the possibilities are endless!

Boiled Bagels
By: Jandl


Ingredients

4 1/4 cups all-purpose flour
2 (.25 ounce) packages active dry yeast
1 1/2 cups warm water (110 degrees F/45 degrees C)
3 tablespoons white sugar
1 tablespoon salt
1 tablespoon white sugar

1.In large bowl, combine 1-1/2 cups flour and yeast. Mix water, 3 tablespoons sugar and salt together, and add to the dry ingredients. Beat with a mixer for half a minute at a low speed, scraping the sides of the bowl clean. Beat at a higher speed for 3 minutes. Then, by hand, mix in enough flour to make a moderately stiff dough.               
2.Turn out onto a lightly floured surface and knead until smooth and elastic (8-10 minutes). Cover, let rest for 15 minutes.

3.Cut into 12 portions, shape into smooth balls. Poke a hole in the center with your finger, and gently enlarge the hole while working the bagel into a uniform shape. Cover, let rise 20 minutes.
4.Meanwhile, start a gallon of water boiling. Put 1 tablespoon of sugar in it, mix it around a bit. Reduce to simmering. When the bagels are ready, put 4 or 5 bagels into the water, and cook 7 minutes, turning once. Drain them. Place on a greased baking sheet, and bake at 375 degrees F (190 degrees C) for 30 to 35 minutes. Remove from oven, eat hot or cold.
Another option to bake them was with Broiling option but I didn't go this route
For a glossier surface, place raised bagels on an ungreased baking sheet prior to boiling them. Broil them five inches from heat for 1 to 1-1/2 minutes on each side. Then put them into the hot water to be boiled as above. Note: do not bake broiled bagels as long as non-broiled ones, 25 minutes should be long enough.

Saturday, November 27, 2010

Pumpkin Pie from Scratch… or to be more exact; the misadventures in pie making

I know I should be far more creative than using pumpkin for my squash entry, but this is the first time I ever made a pumpkin pie from scratch.
I bought several sugar pumpkins last month and had to get them in the freezer.  Right away I knew I would put aside some of the pumpkin to make a pie for Thanksgiving.  There are several methods of storing sugar pumpkins but I prefer to steam them and then freeze.  While I'm sure there are some raw methods out there, most of the pumpkin recipes I have ask for cooked pumpkin so its easier for me to store them this way.  Now I have used the good old jack O’lantern pumpkins before and used the same method of storing but I heard that sugar pumpkins were the way to go so jumped on them when I finally saw some in our store.  Sugar pumpkins are much smaller and the flavor is more intense than what you would get from the typical Halloween jack O'lanterns (big pumpkins!) I've never had a problem using the big pumpkins in cooking before but I suggest you read up on the two differences before you make your own decision.
First you need to cut them and remove the seeds and pulp.  I then just put the pi002eces (flesh still on) into a glass baking pan, add a bit of water and cover with Saran Wrap.  Into the microwave it goes to steam for about ten minutes.  I take the pan out and let the pumpkin cool.  Now its easy to pull away from the flesh (no peeling needed!).  I do a bit of pureeing and place into ziplock bags putting in 1 1/2 cups of pumpkin puree into each bag.
004When using fresh pumpkin, you must drain the puree through some cheese cloth to eliminate the liquid.  All you want to have is the meat of the pumpkin.  I find it    easier to drain over a bowl and refrigerate over night.008
Use your favorite pastry for a 9-inch pie.  My mom swears by the Betty Crocker pastry and so we’ve used that recipe for years.  
Crust for 9-inch pie
1 cup flour
1/2 teaspoon salt
1/3 cup plus 1 tablespoon shortening
2 to 3 tablespoons cold water     
Directions: Mix flour and salt in medium bowl. Cut in shortening, using pastry blender (or pulling 2 table knives through ingredients in opposite directions), until particles are size of small peas. Sprinkle with cold water, 1 tablespoon at a time, tossing with fork until all flour is moistened and pastry almost leaves side of bowl (1 to 2 teaspoons more water can be added if necessary).
Gather pastry into a ball. Shape into flattened round on lightly floured surface. Wrap flattened round of pastry in plastic wrap and refrigerate about 45 minutes or until dough is firm and cold, yet pliable. This allows the shortening to become slightly firm, which helps make the baked pastry more flaky. If refrigerated longer, let pastry soften slightly before rolling.
Roll pastry, using floured rolling pin, into circle 2 inches larger than upside-down 9-inch glass pie plate, or 3 inches larger than 10- or 11-inch tart pan. Fold pastry into fourths; place in pie plate. Unfold and ease into plate, pressing firmly against bottom and side and being careful not to stretch pastry, which will cause it to shrink when baked.
Trim overhanging edge of pastry 1 inch from rim of pie plate. Fold and roll pastry under, even with plate; flute as desired. Continue with directions in pie recipe.
Pumpkin Filling for 9-inch pie
2 eggs
1/2 cup sugar
1 teaspoon ground cinnamon
1/2 teaspoon  salt        
1/2 teaspoon ground ginger
1/8 teaspoon ground cloves
                       1 can (15 oz) pumpkin (not pumpkin pie mix) or use 1 1/2 cups prepared pumpkin
 1 can (12 oz) evaporated milk
      Directions: Heat oven to 425°F. In large bowl, beat eggs slightly with wire whisk or hand beater. Beat in 1/2 cup sugar, the cinnamon, 1/2 teaspoon salt, ginger, cloves, pumpkin and milk.  Carefully pour pumpkin filling into pie plate. Bake 15 minutes. Reduce oven temperature to 350°F. Bake about 45 minutes longer or until knife inserted in center comes out clean. Place pie on cooling rack. Cool completely, about 2 hours.
Pumpkin Patch                                                          
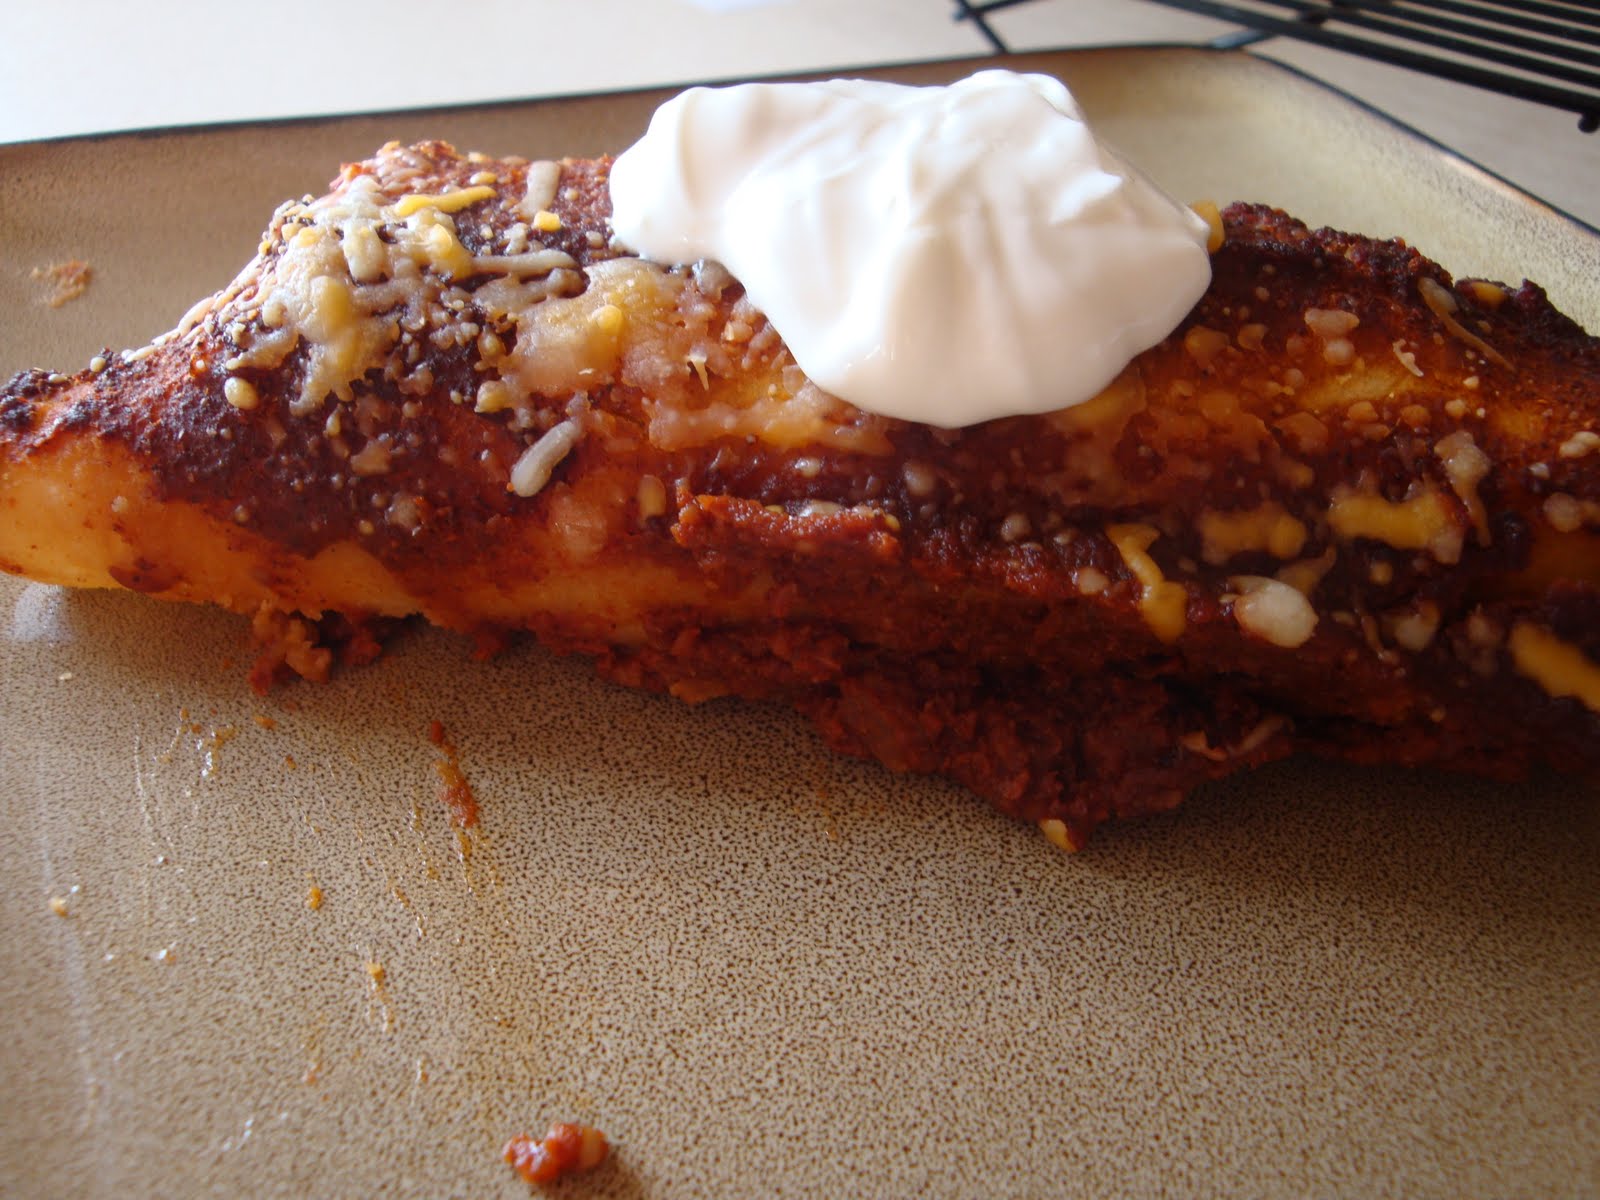
Now all things considered, what should turn out is an amazing pumpkin pie.  Without a doubt ours did… however, the pie pan was placed on a stove top burner to cool.  We honestly thought the burner was off… really, we did.  My stove is possessed- really, it is possessed!  There is no other explanation as to why it is so evil.  The next morning we awoke to this…. Pumpkin jerky…. nasty.  Don’t recommend it to any one! LOL!!!                     

Saturday, August 28, 2010

Fudge Babies - caution; highly addictive

Print Friendly and PDF

The challenge for August, on  the Monthly Challenge, was to visit another members blog and try one of their recipes.
I wanted to take my appetite towards another direction... raw baby, raw. I admit I have been a bit intrigued by the raw diet. Not so much that I want to go raw, but intrigued nonetheless. Housewife in the raw has some appealing recipes but I wanted to go with something I knew I would like... chocolate. I mean, can you really go wrong with anything made from chocolate???? I tried a recipe for Fudge babies- or homemade Lara Bars. These are fudgy, nutty and oh so naughty tasting! These will definitely be something I will make again in the future. Go here for her information and take a peek at her blog. I'm going to do a repeat visit and try her granola recipes next!

My only complaint with this recipe was that it didn't make near enough.
they don't photograph pretty but they taste good!
Fudge Babies
adapted by me


1 1/2 cups pecan pieces
1 1/3 cup pitted dates
1 teapoon vanilla extract
4 Tablespoons dark cocoa powder

I threw everything in to my vita mix and hit the power button. Once everything was chopped up, I took the dough and rolled in to little balls. I'm thinking that I will roll them into coconut next time

Friday, July 16, 2010

Monthly Challenge: Part Two Basil

Print Friendly and PDF
I was a bit disappointed in the Strawberry Soup (although very very tasty) being rather soup-less.  So I thought with another attempt I would use Basil.  This is my first year of having success with growing my herbs in pots out on my deck.  My basil is especially lush and abundant and so I put together this recipe for Penna Carbonara with Basil Lemon Cream that I found here.  I loved the cream but honestly found more of the aroma of Lemon rather than any taste of lemon.  But ohhhhhh, this recipe is indeed lovely.
  The recipe claims to serve four but even with the three of us putting a good amount into our bellies there was still enough for all of us to eat it again for another meal. Also, because my hubby hates vegetables mixed in pasta dishes I had to omit the veggies.  Nuts are another no no for meals so the pine nuts were left out.  This is probably a good thing with the price of pine nuts these day!
Penne Carbonara With Basil Lemon Cream
Yield: 4 Servings

1/4 cup Smoked bacon, chopped  I used half a pound of bacon... never can have too much bacon!
2 oz. Butter
1 tsp. Garlic, minced  I used one clove garlic
1/4 cup Onion, diced  Used half of an onion
1 cup Mixed vegetables: carrot, peas, corn, Lima beans, green beans omitted
2 tsp. Pine nuts, toasted omitted
1 1/2 cup Chef Larry's Basil Lemon Cream (recipe follows)  I ended up using all the cream sauce because I felt it was too dry at the 1 1/2 cup amount
1 1/4 lb. Penne Rigate pasta, cooked "al dente"
1 tsp. Parsley, chopped
to taste Salt
to taste Fresh ground black pepper
1/2 cup Shaved or shredded Parmesan cheese (optional)  I served with a tons of Parmesan... for me, Parmesan cheese is never optional!
to garnish Fresh chopped parsley
Method:
     Prepare Chef Larry's Basil Lemon Cream per recipe, reserve. Cook bacon in a sauté pan over medium heat until cooked. Add butter, garlic and onion. Sauté garlic briefly, do not brown. Add mixed vegetables and pine nuts. To heat pasta: place cooked pasta in lightly salted simmering water for 1-2 minutes to reheat (do not overcook.) Remove pasta from water and drain well. Add heated pasta to sauté pan with bacon and vegetables. Stir in enough of Chef Larry's Basil Lemon Sauce to coat pasta and vegetables. (Add sauce in intervals until pasta and vegetables are nicely coated.) Season pasta with salt and fresh ground black pepper. Add 2/3 tsp. of chopped and mix well. Portion pasta into heated pasta bowls. Top with optional shaved Parmesan cheese and additional chopped parsley. Serve immediately.

Basil Lemon Cream
Yield: 2 cups

1 tsp. Butter
1 tsp. Shallots, minced  I used half of a shallot but could easily use onion
1/4 tsp. Garlic, minced  I used one clove garlic
2 oz. White wine
1 1/2 cups Chicken stock  only had canned chicken broth on hand
2/3 cup Heavy cream
1 1/2 tsp. Fresh lemon juice
to taste Salt
to taste Fresh ground black pepper
8 Basil leaves, finely minced
as needed Roux to thicken (equal parts flour and melted butter)  I used 1 tablespoon butter melted with enough flour to make a paste 
Method:

Melt butter in a saucepan, do not brown. Add shallots and garlic, sauté briefly. Add white wine, bring to a simmer and reduce by 1/2. Add stock, bring to a simmer. Cook over medium low heat for 10 minutes. Add roux to achieve desired consistency, continue to simmer. Add cream and lemon juice. Season with salt and pepper. Finish with fresh minced basil.

Wednesday, July 14, 2010

Monthy Challenge: July's Farmer's Market Strawberry Soup

Never to turn away a challenge, this month I started with the monthly challenge.  The challenge for this month was to use something in season.  I've always wanted to try a fruit soup.  I found this interesting recipe for Strawberry Soup at allrecipes.  I made a few changes based on the ingredients I had in my kitchen as I was too hot and too lazy to go shopping!  It was delicious, but more beverage like than soup though.  Will have to try another fruit soup again.... someday.  I have posted the recipe as I found it and in the italics I have put my changes.  Enjoy!

Strawberry Soup(ish)
serves five

2 pints strawberries 
      2 cups plain yogurt    I used vanilla yogurt
1/2 cup orange juice
1/2 cup white sugar
1/2 cup water
1/8 teaspoon ground cardamom  I replaced the cardamom with ground ginger
Directions
In a blender, combine the strawberries, yogurt, orange juice, sugar, water and cardamom. Puree until well mixed. Chill and serve.