Monday, January 9, 2012

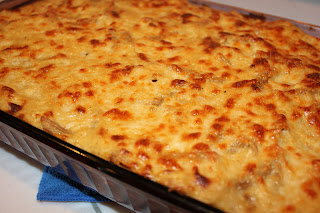
Pastitsio - pasta with warm winter spices!


For me, a winter comfort food would either be a soup or a casserole.  Not only are they generally big on flavor, but they are usually easy on the wallet.  I'm not talking about the Campbell soup casseroles either... you know, the type where you just open up a couple cans and throw in some rice or noodles.  While those will do in a pinch, they are not what I look for when I think comfort.  No, I'm talking about deep, full flavors.  This recipe for Pastitsio certainly fit the bill.  You have layers of tomato sauce that has just a hint of cinnamon and another layer that is more of a white sauce with a touch of nutmeg.  Incredibly easy and full of flavor, this is a casserole that makes you forget all about all the others!

Pastitsio
2 lean ground beef
6 garlic cloves, minced and divided
4 teaspoons ground cinnamon
2 teaspoons ground oregano
1/2 teaspoon red pepper flakes
salt and ground black pepper, to taste
1 (28-ounce) can crushed tomatoes
1 (8-ounce) can tomato sauce
1/4 to 1/2 cup red wine (or water if you prefer)
1 pound penne pasta
1 (12-ounce) can evaporated milk (I used skim)
1 1/2 cups vegetable or beef broth (I used beef)
3 tablespoons butter
1/3 cup all-purpose flour
1 1/2 cups grated Parmesan cheese
1/4 teaspoon ground nutmeg
2 large eggs

Directions:
Preheat oven to 425 degrees F.
Heat a pan over medium-high heat; add ground meat.  Cook until is browned.
Add Four of the minced garlic cloves, the cinnamon, oregano, pepper flakes and a
 generous sprinkling of salt and pepper.  Cook until fragrant and spices are 
well incorporated, about 2 minutes.  Add tomatoes, sauce and enough wine, or water,
 to make a sauce that is suitable to your taste but still not too thin. You will be
 layering the sauce as you would for a lasagna so keep in mind that thickness. 
Bring to a boil, reduce heat to medium-low and continue to simmer, partially covered,
 until sauce is thick and richly flavored, about 20 minutes.
Cook pasta according to package directions; drain and set aside.

Microwave milk and broth in a quart measuring cup, cover lightly with plastic wrap
 and cook until steamy and hot.  How long this takes will depend on your microwave. 
 Mine only took 4 minutes.
In a medium saucepan; heat butter and remaining 2 cloves minced garlic until garlic
 is slightly golden.  Whisk in flour until well blended.  Pour in hot milk mixture while 
whisking vigorously until sauce is smooth and starts to thicken.  Stir in 1/2 cup of
 the Parmesan cheese and nutmeg; season to taste with salt and pepper. In a separate
 bowl, whisk together the two eggs; add a ladle full of the broth mixture to the eggs 
and whisk to combine.  Add the egg mixture to the remaining broth in the 
sauce pan and whisk to fully incorporate.
Add a ladle full of tomato sauce mixture to bottom of a 9 x 13-inch baking pan.  
Spread half of the pasta over the the pan and top with remaining tomato mixture; 
sprinkle with 1/2 cup Parmesan cheese.
Top with remaining pasta and pour over the top the milk/broth mixture; 
cover top with remaining Parmesan cheese.
Cover pan with foil; bake 30 minutes.  Remove foil and turn oven to broil.  
Watching carefully, broil until tops is spotty brown, 3-5 minutes.  
Remove from oven and let stand to set 10-15 minutes.  Cut into portions and serve.
Yields: 8 serving


Sunday, January 8, 2012

Scotch Eggs

 Deep Fried sausage rolled eggs.... talk about cholesterol on a plate!  But oh, it was indeed quite yummy! I've seen Scotch Eggs mentioned in several food magazines of late and had to admit my family and I were quite intrigued. I finally caved in when another food magazine came in and once again the Scotch Eggs were shown.  I sat back and enjoyed a glass of wine while my hubby and daughter put this dish together.  Its called living the good life :-)

Scotch Eggs
makes 4
adapted from Bon Appetit magazine

6 large egs
1 cup all-purpose flour
1 cup finely crushed corn flakes
1/2  package Jimmy Dean sausage
Vegetable oil for frying
Kosher salt, freshly ground pepper
mustard, for serving

Directions:

 Place4 eggs in a small saucepan; add cold water to cover.  Bring to a boil; remove from heat, cover and let stand for 3 minutes.  Carefully drain, then fill pan with ice water to cool eggs.  Gently crack shells and carefully peel under cold running water.  Place eggs in a bowl of cold water; cover and chill until cold
Place flour in a wide shallow bowl and crushed corn flakes in another wide shallow bowl.  Divide sausage into 4 equal portions.  Pat 1 portion of sausage into a thin patty over the length of your palm.  Lay 1 soft-boiled egg on top of sausage and wrap sausage around egg, sealing to completely enclose.  Repeat with remaining sausage and eggs.
 Whisk remaining 2 eggs in a medium bowl to blend.  Working gently with 1 sausage-wrapped egg at a time, dip eggs into flour, shaking off excess, then coat in egg wash.  Roll in corn flakes to coat.
This can be made 1 day ahead.  Keep refrigerated and uncovered.


 Attach a deep-fry thermometer to side of a large heavy pot.  Pour in oil to a depth of 2" and heat over medium heat to 375 degrees F.  Fry eggs turning occasionally and maintaining oil temperature of 350 degrees F. until sausage is cooked through and breading is golden brown and crisp, about 5-6 minutes.

Use a slotted spoon to transfer eggs to paper towels to drain.  Season lightly with salt and pepper.  Serve warm with mustard.

Saturday, January 7, 2012

Crazy Cooking Challenge: Shaker Chicken Noodle Soup

This month's Moms Crazy Cooking Challenge (the brainchild of  Tina Messick-Hudgens) was to find a recipe for chicken noodle soup.  The challenge isn't necessarily making the recipe, for me it is in finding a recipe.  You see, we have to use a recipe from someone's blog that isn't a professional blog (ie Pioneer Woman, Paula Deen, etc.) While there are a gazillion recipes for chicken soup out in the world wide web, finding one that wasn't originally from on of those professional sites.  Deep into my search I came across this wonderful blog called  Kitchen Trial and Error and found the perfect soup recipe.  This is a recipe that was handed down to her from her mother. It was on a photocopied piece of paper that did not include who it originally came from.
The only change I made was to make my own noodles.  I also leave the noodles cooked, but stored on the side.  If you leave the noodles in the soup they can become mushy and absorb too much liquid.  I put some in a bowl and then ladle on the soup.
Shaker Chicken and Noodle Soup
serves 8
13 cups chicken stock, divided
1/4 cup dry vermouth
1/4 cup unsalted butter
1 cup heavy cream
1 cup diced celery
1 cup diced carrot
12 ounces dry egg noodles (I made my own noodles for which the recipe follows)
2 cups cooked diced chicken
1 1/2 cups water
1/2 cup all purpose flour

in a small saucepan, combine 1 cup stock, vermouth, and butter. bring to a simmer and cook until reduced to about a quarter cup, about 20 minutes. the mixture will darken and be thick and syrupy. remove from heat and stir in the heavy cream. set aside.

see how much it reduces!!


coat the bottom of a stock pot with olive oil and set over medium heat. saute the celery and carrot until softened, about five minutes. add the remaining 12 cups of chicken stock and bring to a boil.
.Stir in the chicken and cook until heated through and bring back to a boil.
whisk together the 1 1/2 cups water and 1/2 flour until no lumps remain. Add a ladle of hot broth to the mixture and whisk to combine.while continuously stirring the soup, add the flour and water mixture. cook, stirring continuously for about 2 minutes, or until slightly thickened. do not let the soup boil.
Stir in the reserved reduced stock, vermouth, butter, and cream mixture. taste and season with salt and pepper. Serve immediately and do not let the soup boil.stir in the reserved reduced stock, vermouth, butter, and cream mixture. taste and season with salt and pepper. serve immediately and do not let the soup boil. leftovers reheat perfectly.

Easy Peasy Homemade Pasta
1 egg
3 egg yolks
3 tablespoons cold water
about 1 tablespoon salt
2 cups flour

Beat the egg and egg yolks until light. Add water and salt; beat in.
Work the flour into the mixture, with your hands, to make a stiff dough.  Cover with plastic wrap and let rest at least 10 minutes.
Cut into three equal parts. Lightly dust a board with flour and roll out one part of the dough as thin as you desire.... I like mine not too thin, but it can't be too thick either.  Using a sharp knife, cut into 1/4-inch wide strips.  strips

Spread them out on a cookie sheet and let dry.  You aren't looking for a totally dry noodle, but one that has lost most of its surface dampness.  I generally let mine dry at least fifteen minutes.
Bring a large pot of salted water to a rolling boil.  Boil noodles until just tender... this can take 5-to minutes depending on the thickness.  Drain water and serve.


Photobucket

Friday, January 6, 2012

Playtime with Lyra- Sensory Box

My little grandsweetie is getting so big!  We babysit her while mommy works so I am always trying to think of something else to do rather than play princess or watch Frosty, again. As I've mentioned before, I've become a big fan of Pinterest.  As if my plate wasn't full enough, I know have a bulletin board showing me all that I've not yet done! LOL! There are some great ideas to use with kids and I thought I would share with you something we've done. One blog I've pinned a ton from is Play at Home Mom.  While Lyra has some small choking hazard items in this, she only plays with this when we are sitting at the table.  I've got some bigger items for her to find when she plays alone.
While I could have used plain colored rice, I opted to use my neon food colors and give her some color.  After the rice was colored I laid it on to a cookie sheet and dried it in the oven.
 Be prepared to sweep up after this project!  Rice can get a bit all over the place.
I'm a lot less anal about messes now that I'm a grandma!
God Bless!!

Wednesday, January 4, 2012

Snowmen treats

I'm sure that these ideas are old to most of you.  However, I'm a grandma now and get
 to do all these fun things that were too "babyish" for my grown kids.  
Sure I have my Sunday school kids and the Cubbies Preschoolers....
 there's just something special about doing it for you own
 little one and seeing the delight in her eyes!
The first snowman we made for gifts for the Sunday School children. 
My fabulous hubby wrote a poem for us to attach on the bag. 
 He is amazing and his this gift for just being able to whip up a poem whenever I need one.
Feel free to use the poem yourself but please give Neil Thiele credit for writing it.
  A link back to my blog would be awesome too!


I’d like to make a snowman, that wouldn’t melt away,                                             
I’d make him with my own two hands so with him I could play.                            
I’d love him and he’d love me.  Together we’d have fun,                                        
sharing our adventures until the day was done.                                                       

But Winter doesn’t last all year, and I begin to think                                                          
the snowy friend that I had made, will soon begin to shrink.                                             
His face will start to sag and droop, almost as if he’d felt                                         
the sun that shines upon his face and causes him to melt.                                         
I know that I will miss my friend but I will have no fear,                                         
‘cause I can make another when it snows again next year.                                       
           
But Jesus is a better friend, which never goes away                                                  
He made me with his own two hands, exactly just this way.                                    
I’ll love Him ‘cause He loves me, together Gods’ own son                                      
will share in everything I do, whether it be sad or fun.                                              

He’ll never move away from me, and in my heart He’ll stay                                    
‘cause I believe God sent His son, and for my sins He’d pay.                                  
 He shines his face upon me, and I can say I’ve felt                                                 
                                           That Jesus let me truly see and caused my heart to melt.                                                                                                  
Now the Lord is with me, of that here is no end.                                                    
His love is always with me, Jesus my best friend.                                                     
 Written by Neil Thiele 
12/22/2011

This next snowman was for a snack for my grandsweetie.  She is really big on
Frosty the Snowman these days.... seriously big on it.  Like seven times a day
she wants to watch it, big.
This was so simple to make and it really made her day.


Tuesday, January 3, 2012

Chicken Piccata

I think we eat more chicken than any other meat.  It gets old very quick, so I am always on the lookout for something new to try.One of my favorite food magazines is Cuisine at Home.  It reminds me of what Taste of Home magazine used to be....before they made a bunch of revisions.  I found a recipe for Chicken Piccata that sounded good (if you omit the capers... YUCK!) so I added it to this month's menu.  It was pretty yummy and, aside from the time it took to pound out, went relatively quick.  Even my finicky son liked it and that's saying something!! 
The original recipe serves two but I had to make enough for eight people.  
I've typed out the recipe for making 4 servings.  I also had to do double pans so 
my pictures will be from one or other pan I used.  Sorry!
 Chicken Piccata
Makes 4 servings
adapted from Cuisine at Home magazine

4 boneless, skinless chicken breast, cut in half
and pounded into cutlets
Salt and black pepper
All-purpose flour
4 tablespoon vegetable oil
1/2 cup dry white wine
1 teaspoon minced garlic
1 cup chicken broth
2 tablespoons fresh lemon juice
2 tablespoon drained capers (which I left out!)
4 tablespoons unsalted butter

Directions
Season cutlets with salt and pepper, then dredge in flour.
In a large saute pan, add oil and heat over medium high heat.
Saute cutlets 2-3 minutes on one side.  Flip cutlets over
and saute the other side, covered, 1-2 minutes. Transfer
cutlets to a warmed platter; pour off fat from the pan.

Deglaze pan with wine and add minced garlic. Cook until garlic is slightly
 brown and liquid is nearly evaporated, about 2 minutes.
Add broth, lemon juice and capers (if you want them).
Return cutlets to pan and cook on each side for 1 minute.  
Transfer cutlets to warm plates.
Finish sauce with butter.  Once butter melts, pour sauce
over cutlets.
Garnish with chopped fresh parsley and lemon slices (if desired).
Serve immediately.
Print Friendly and PDF

Monday, January 2, 2012

Spinach and Ricotta Manicotti


I'm back and recovered!  What a fun time that was... NOT!  My belly button is still sore.  
I'm telling you this, things are not meant to come out of your belly button!  'Nuff said.
I am just thrilled to be back in the kitchen again.  I don't know why it wasn't as much fun when the kids were growing up.  Well, maybe I do.  They are a lot less picky at their adult ages than when they were kids.
For dinner I made up some Spinach and Ricotta Manicotti along with some 90 minute bread. Both are very easy to make and allowed for me to cook between loads of laundry.  I saw a recipe for the Spinach and Ricotta shells but I didn't want to stuff a bunch of shells; The Manicotti was easier. To make it a lot more easy, one could easily use it as the filling for a meatless lasagna. I combined a couple different recipes and made my own Marina sauce.

Spinach and Ricotta Manicotti

Sauce:
1 medium onion, diced
2 tablespoons olive oil
1 clove garlic, minced
1/2 cup white wine
1  28-ounce can crushed tomatoes
4 tablespoons chopped fresh parsley
1 tablespoon dried basil
2 teaspoons dried oregano
1 teaspoon salt
1/4 teaspoon fresh ground black pepper
1/4 teaspoon Cayenne

Filling:
2  15-ounce containers ricotta
2 cups baby spinach, chopped
1/3 cup chopped Parsley
1 tablespoon fresh thyme, minced
1 egg
1 shallot, minced
Salt and Black pepper, to taste
1/2 cup grated Mozzarella
1/2 cup grated Parmesan

Manicotti:
1 box Manicotti (mine yielded 14 shells)
1/3 cup Parmesan, grated
1 cup grated Mozzarella

Directions:
In saucepan, cook onion in olive oil until slightly translucent; add garlic
 and continue cooking 1 minute more.
Deglaze pan with whitewine.  Add crushed tomatoes and remaining
sauce ingredients.   Let cook for about twenty minutes.

Cook Manicotti according to box directions.

To make filling;  chop spinach.  I like to wilt my spinach in a saute pan.
In a mixing bowl, combine remaining ingredients and mix well.
  Add spinach and mix thoroughly.
Fill a piping bag with ricotta filling and pipe into  cooked manicotti. I find that
inserting the piping bag half way and filling as I am pulling out works best.
I then turn it around and fill the other half using the same method.
In a 9-inch x 13-inch pan, add a scoop or two of the marinara sauce to the bottom of the pan.
Top with filled manicotti.  Add remaining marinara sauce to the top of the manicotti and top with remaining Parmesan and mozzarella cheese.
Bake at 350 degrees F., for twenty minutes.  Let set five minutes and then serve.